Showing posts with label Old Glory. Show all posts

Friday, January 14, 2022

Early Germans vs Huns: Another 100pt ADLG Battle

 Recently, we had another ADLG battle. We enjoy the effects that ADLG allows horse archer types during the game, such as evading and distant shooting. ADLG is also a step-reduction game, where the elements/units are worn-down step by step in combat, whereas in games like DBA, the units are mostly either recoiled back a short distance or destroyed outright.

In our latest game we used the Early Germans (250AD) vs the Huns (374AD), so an out-of-period battle where the armies existed about 124 years apart. We used Huns from a period prior to Attila (who appeared about 433AD). Below is an order of battle for our game. Note that each army below is made up of a single corps or command. The latest version of ADLG now requires 100pt armies to be composed of two commands, so we will adjust our armies for future games:

Huns:

1 x Brilliant CinC (Mundzuk) & Elite Heavy Cavalry, Bow

1 x Heavy Cavalry, Bow 

12 x Horsemen: Light Cavalry, Bow

Total: 14 units

Germans:

1 x Brilliant CinC (Arminius the Younger) & Bodyguard of

 Elite Medium Cavalry

2 x Horsemen: Elite Medium Cavalry

4 x German Tribes: Impetuous Heavy Swordsmen

2 x Veteran Germanic Tribes: Elite Impetuous Heavy Swordsmen

1 x Skirmisher: Light Infantry, Bow

3 x Skirmishers: Light Infantry, Javelins

Total: 13 units

Below is an account of our game.

The Hun army deployed at the crest of a low ridge. The Hun Nobles are in front of the camp, with 2 wings of bow armed horsemen. A small wood is in the lower right of the photo.


  Another view of the Huns.


The German army deployed opposite, also on a low ridge (no effect for game purposes).


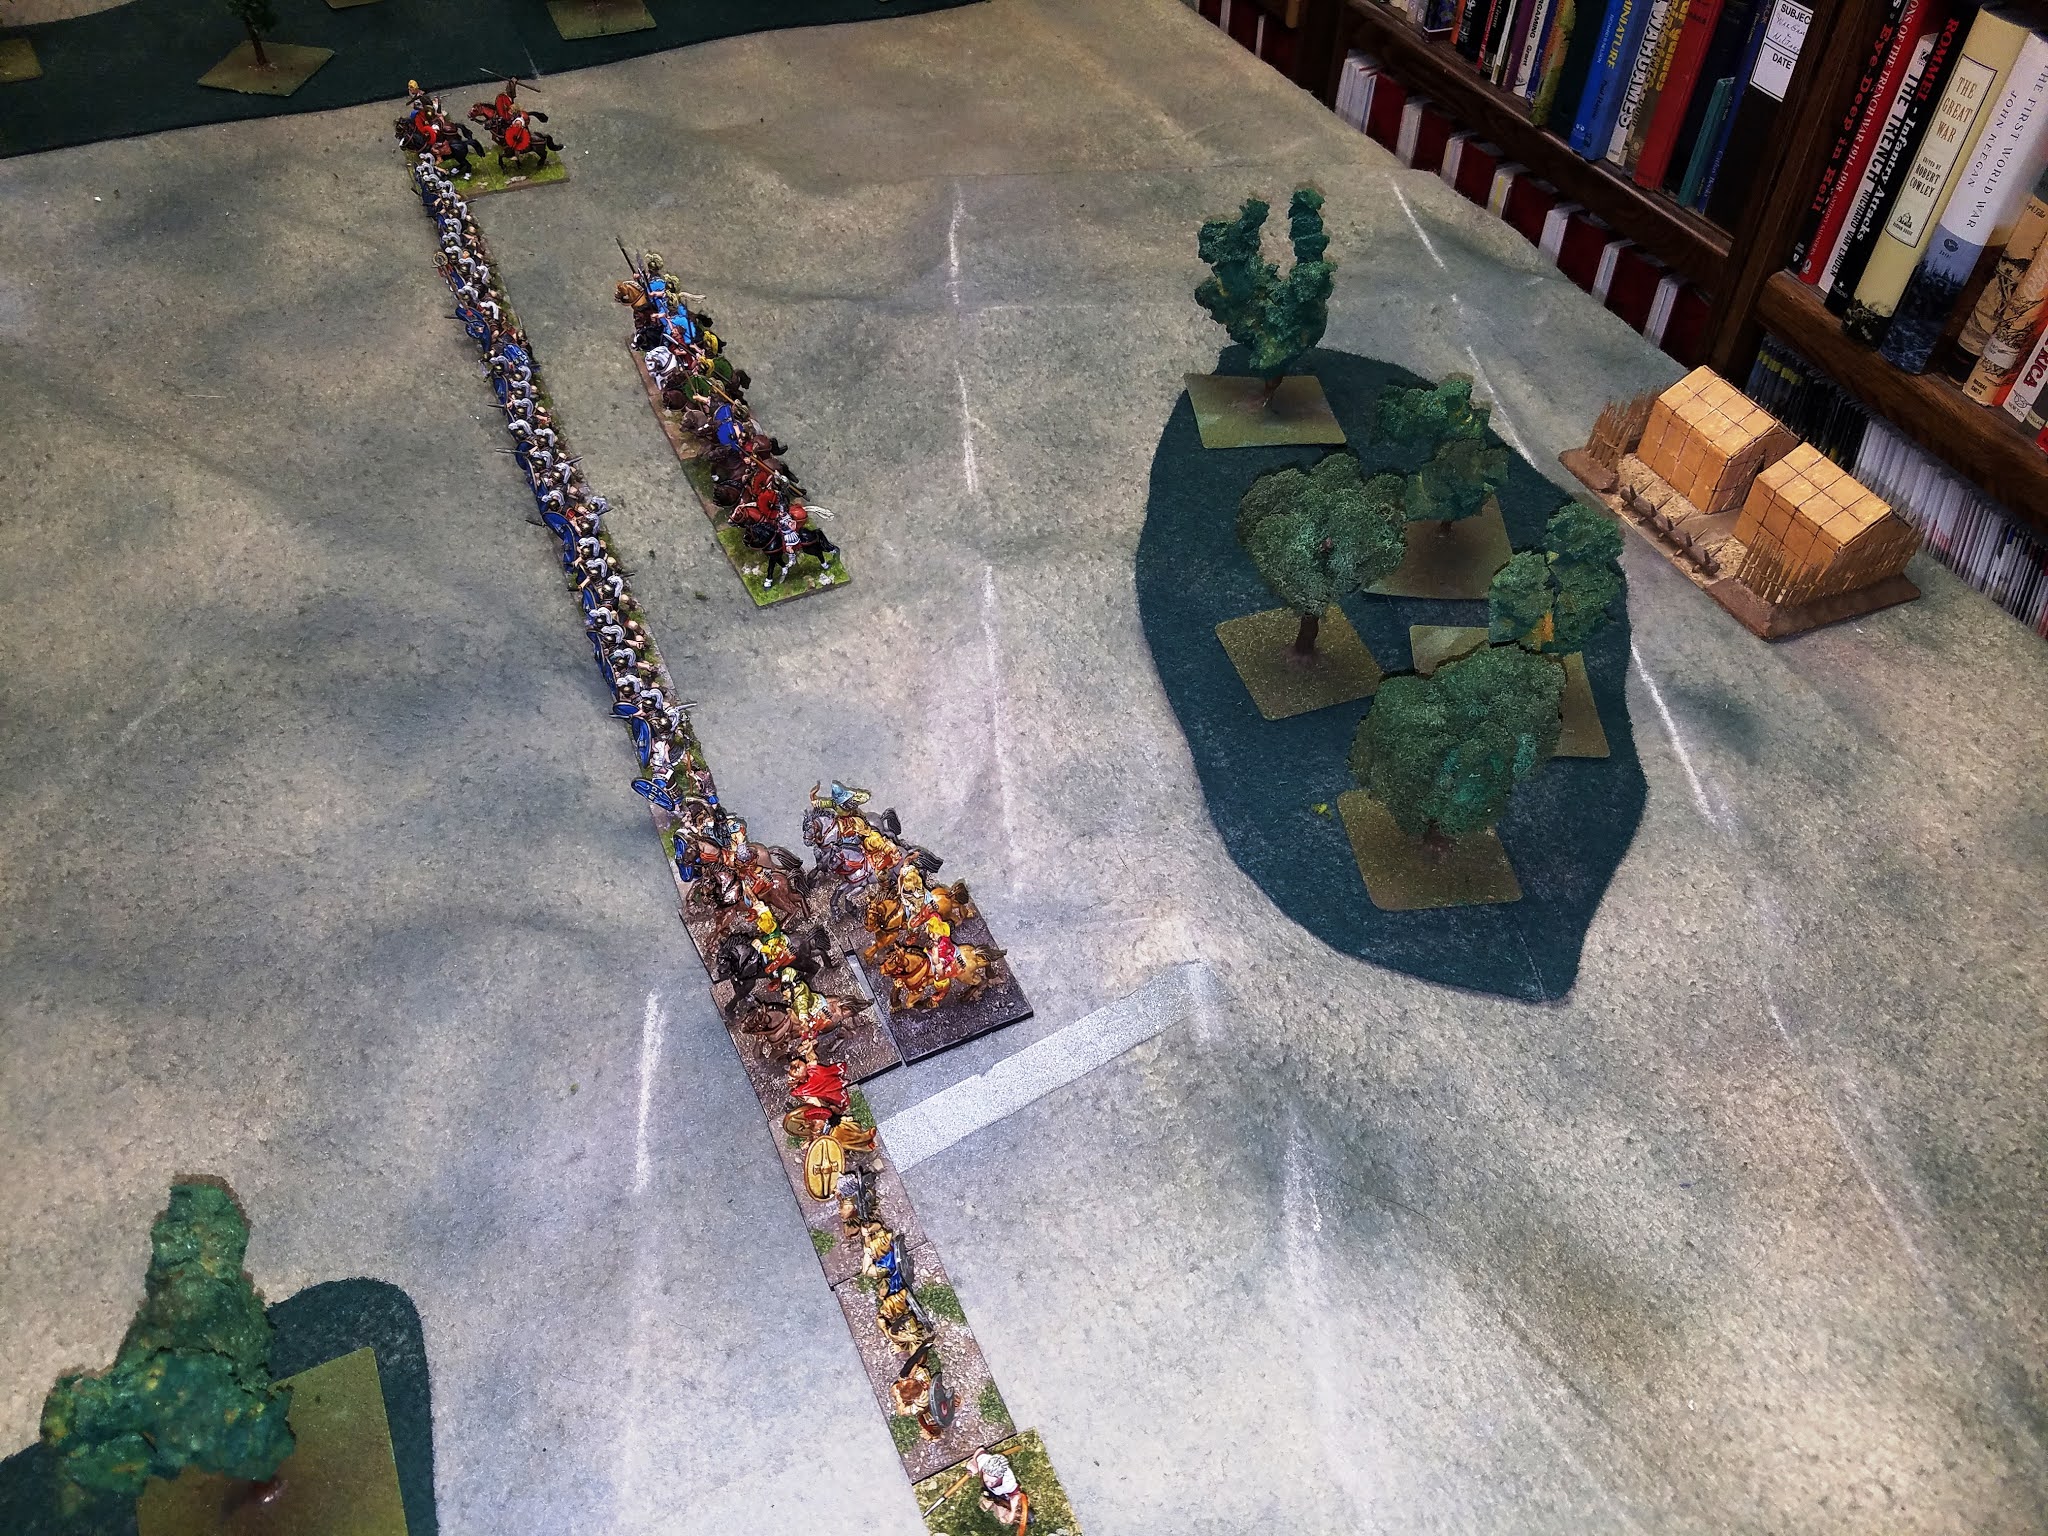
An overview of the battlefield. The Germans (left) have moved their left flank javelin-armed skirmishers towards the field (outlined with rocks), supported by their medium cavalry elite horsemen. The Huns (right) have advanced forward into the valley.
 

Another overview of the battle.
 
 
The Huns ride up to close range and shoot into the German tribesmen.


The javelin armed German skirmishers attempted to engage the Huns in the flank, who subsequently evade away.


The Huns about face the next turn and engage the skirmishers with bow fire. The Hun bow fire on the near flank is ineffective.


The Germans try attacking the Huns on the near flank, who evade. 


The Huns have routed a skirmisher in the field in close combat, and scored bow hits on the others.


The Huns close in and rout the rest of the skirmishers in the field.
 
 
The Huns on the far flank reform and begin to work around the German flank. The near flank Huns have turned around and moved back into bow range.


The German line starts to break up. First, the German Elite Horsemen move forward past the field towards the Hun Nobles. Some German tribesmen charge the Huns on the near flank, but the Huns evade.
 
 
Far flank Hun horsemen move towards the flank of veteran (elite) German tribesmen, while the near flank Huns turn around and come into bow fire range of the Germans.


The veteran German tribesmen turn & face the Hun horsemen on the far flank. The German elite horsemen charge the Hun nobles, who evade (upper right).  The German tribes on the near flank are reforming their line as the Hun horsemen approach.


The far flank Huns (upper left) are engaging the veteran German tribesmen with bow fire. The Hun nobles (upper right) have made an about face and move into bow range of the German horsemen, while another group of Hun horsemen is on their flank. A Hun unit on the near flank has routed a German skirmisher unit (not shown). 


Clockwise from upper left: One group of Huns have evaded the German veterans while another moves into bow range, The German horsemen are engaging the Hun nobles but it is going badly as all three German horsemen units have taken 2 hits each from melee and bow fire, and the Huns on the near flank are moving into bow range again and inflicting hits on the German tribesmen.


The last act clockwise from top left: The Huns have reformed to attack the veteran Germans with bow fire, the Hun nobles (upper right) have routed all the German horsemen, and the near flank Huns (below) are firing for effect on the German tribesmen. German casualties have forced army demoralization at this point, including the 4 units in the photo disordered from bow fire.

Another hard fought exciting game (well, exciting for the Huns anyway). Miniatures are 28mm Old Glory figures.


Wednesday, February 24, 2021

A Debacle for Marius in Numidia

 We had another DBA 3.0 game, this time in 28mm using Old Glory figures and the DBA 24 framework for the game. The setting is a fictional invasion of Numidia on, or after 105BC. The forces are as follows:

Marian Romans (II/49)
Marius (CinC) & Roman Cavalry (Cv) x 4
Spanish Light Horse (LH) x 2
Asiatic Horse Archers (LH) x 4
Thracian Mercenaries (3Ax) x 2
Skirmishers (Ps) x 2
Legionaries (4Bd) x 10

Numidia (II/40)
Jugurtha (CinC) & Numidian Nobles (Cv) x 2
African War Elephants (El) x 2
Numidian Skirmishers (Ps) x 8
Numidian Light Horse (LH) x 10
Roman trained Numidian Imitation Legionaries (Bd) x 2

Both sides chose an element for their sub-general, per the DBA 24 guidelines.

The terrain for the battle was pre-set, and contained most of the wooded area you could ever find in Numidia, as well as difficult hills, all "bad going" according to the DBA rules. The difficult hills were outlined with chalk on the mat.


Above shows the deployment. The Numidians (on the left) were the defenders and chose their side and deployed first, the Romans (on the right) deployed second and moved first. The Romans thought they could take the woods to their front on the left with their Thracian auxilia and skirmisher units, supported by the Asiatic Light Horse to their right. However, this proved to be the error that cost the Romans the game, as we shall see. Note that the Asiatic Light Horse was deployed in part on the difficult hill, also an error.


An overhead view of the Roman deployment & camp.


An overhead view of the Numidian deployment. Note some of the Numidian cavalry also deployed on the difficult hill (upper right). This also proved to be an error, but did not cost the Numidians (other than extra pips) during the course of the game.


The above photo shows the Thracians had moved down the difficult hill into the woods, but were counterattacked by the Numidian skirmishers, who made a double or subsequent move into and through the woods on the first bound. Contacting the Roman light troops, the Numidians destroyed the Roman Psiloi unit. Note the Asiatic Light Horse in the background attempting to move away from the difficult hill at 1 BW per turn.


Another view.


The Asiatic Light Horse finally get off the difficult hill. Another Thracian auxilia is destroyed by the Numidian skirmishers near the wood, the the remaining one tries to keep from being outflanked and destroys a Numidian skirmisher. Marius sends a Cavalry unit to support the left, careful to avoid the difficult terrain, which slows movement to 1 BW/turn and gives a -2 penalty in combat.


In the photo above, the Numidians are pressing their attack with their skirmishers in the near woods, also attacking the Asiatic light horse forcing it to turn and face. The Numidians have supported their force in the woods by bringing up 4 elements of Light Horse to face the Asians, along with the war elephant (behind). At the top of the photo, the Numidians are sending a force of 4 skirmishers into the far woods, and their line of cavalry is moving off the difficult hill in the center.


The Numidians continue pressing their attack out of the woods, as the Numidian Light Horse contacts the Asiatic Horse Archers next to the woods. Marius has send 2 Roman Legionary elements to support the Asians and another Roman cavalry element to the left.


At this point, the fight on this flank is consuming most of the pips for both sides each turn as the adversaries try to gain the upper hand over the other. The Romans have now lost the remaining Thracian peltast unit and 2 Asiatic Light Horse units. The Numidians have lost one light horse element, while another has fled (off screen to the left).


The Romans have fed more Legionaries into the center to face the approaching Numidian war elephant with cavalry support. Meanwhile the Numidians are positioning to surround the Asiatic Light Horse near the hill (lower right).


The battle finale: the Romans lose the Light Horse unit near the hill to Numidian skirmishers, and a Legionary element to the war elephant (center). The Roman casualty count is now 8 elements lost, and this ends the game.

The game was exciting and a learning experience, exposing the dangers of bad going to mounted and heavier infantry and it's ability to isolate a section of the battlefield. By advancing into the woods on the left flank, the Roman auxilia and psiloi were effectively isolated and difficult for the Romans to reinforce. A better strategy may have been for them to either deploy and defend on top of the difficult hill, where they would have had the elevation bonus, or kept in the open terrain to negate any advantage the Numidians had in bad going.


Sunday, November 25, 2018

Small Napoleonic Armies: French Army Ready

My French Army for my Small Napoleonic Armies project is finally where I want it to be. My figure painter gave me 36 painted figures last month, though he still has another 36 or so to go. In the mean time, I found some Essex 28mm figures that I had purchased over 25 years ago and had completed some and started some. I decided to finish these (36 figures) and now my army is ready for some large scenarios.


Above is the army as it stands now. I have 27 stands of regular infantry (about 2/3 Victrix plastic, about 1/3 Essex metal). The Essex figures are in the center infantry group between 2 groups of Victrix. In the background are 2 stands of dismounted dragoons (Perry plastic) & 3 stands of Perry Line Grenadiers (metal). To the right are 8 stands of Perry plastic Dragoons & Hussars. In the foreground are 15 gunners & 3 guns (Victrix plastic) and 2 metal guns (Old Glory). The Marshals are Perry metal figures. All the figures are mounted on 60mm frontage stands, originally intended for the HFG (Horse, Foot, & Guns) rules. This scheme (with each stand = brigade/grand battery) will also work for the following rules: DBA-HX 3.0, DBN 2.1, Volley & Bayonet, Grande Armee, and the Blucher rules by Sam Mustafa. The single 4 figure stands of infantry may not look impressive as a brigade. However, I can double up the stands to make 8 figure brigades for smaller battles, and use single stands for larger battles. My French army still needs cuirassiers & chasseurs a cheval, so that is something to do for the future, along with the Imperial Guard. That is the plan for now, anyway.


Above, I also completed more Austrians, a stand each of Cuirassiers and Dragoons. The figures are Casting Room Miniatures in 28mm. They were fun to paint, as well, with a lot of nice detail. This now brings my Austrian army up to 16 stands of regular infantry, 3 grenzer, 4 artillery, 6 cavalry, 5 grenadier, and 4 stands of General officers. I have 1805-7 Russians waiting in the wings to do next.

Tuesday, May 8, 2018

28mm Skythian DBA Army Done

I finally finished my 28mm Skythian Army that I started over a year ago. This is what I have: 4 x Cavalry or Knights, 8 x Light Horse, and 3 x 3Ax (Fast Auxilia).

Below is the army:


The cavalry/knights below are First Corps 28mm Skythian Nobles:


The light horse below are Old Glory 28mm Skythian horse archers:


The figures below are 25mm Ral Partha Skythian horse archers and Thracian javelinmen, figures I painted over 30 years ago, but have been re-purposed for DBA:

More pix below:


At some point in the future, I will flock & tuft the bases on these guys!

Tuesday, June 7, 2016

Old Glory Thracians

I just finished painting a bag of 30 Old Glory 28mm Thracians. Now I have Thracian units for ADLG and enough elements for a Thracian DBA or BBDBA army where the Thracians were auxiliaries.

 I based them 3 to a base. In DBA, Thracians can be 3Ax or 4Ax. I decided to base them all on 3 figure bases and designate certain elements (the white theuros shields) as 4Ax when needed. The figures are nicely animated, some of Old Glory's better figures.

As you can see from behind, the Thracians have crescent shields of various designs, as well as ochre & white theuros shields.