I haven't posted anything in awhile, though we have been playing a few DBA games here & there. Recently, we took a diversion from our usual DBA encounters and wanted to try something completely different, so we tried a 100 pt game of ADLG (Art De La Guerre) using Patrician Romans vs Attila's Huns. While many of ADLG's game mechanics are similar to DBx series games, ADLG has some unique mechanics of it's own, including step reduction for combat, missle fire by all troop types capable of doing so (not just abstractions as in DBA for Psiloi, Light Horse, etc.), and the ability to evade when charged by the enemy. We also tried using Armati II, but didn't like having to track not only hits, but also fatigue for individual units as well, and the rules system was unlike DBx in many ways. ADLG has more game mechanics that we are used to. We used version 3 of ADLG, as we hadn't yet obtained a copy of version 4 at the time of our game.
Below is an Order of Battle for our game:
Attila's Huns:
CinC: Ellac, Brilliant General, attached to Nobles.
1 x Nobles: Heavy Cavalry, Bow
4 x Huns: Light Cavalry, Bow
2 x Subject Heruls: Heavy Cavalry, Impetuous
4 x Subject Goths, Heavy Swordsmen, Impetuous
2 x Skirmishers: Light Infantry, Bow
Patrician Romans:
CinC: Aesop, Brilliant General, attached to Equites
1 x Equites: Heavy Cavalry, Impact
1 x Equites Clibanarii: Cataphract
1 x Equites Illyricani: Light Cavalry, Javelin
2 x Mounted Foederati: Heavy Cavalry, Impetuous
1 x Decadent Legionaries: Heavy Swordsmen
3 x Auxilia Palatina: Medium Swordsmen, Impact, Support
2 x Exulcatores: Light Infantry,Javelin
1 x Heavy Artillery
Total: 12 units, 100 pts
As you can see from above, the 100 pt armies in ADLG are very similar in size to a standard 12 element DBA army.
An account of our game is below. Note that all infantry units, except for light infantry, are 2 ranks of elements in ADLG.
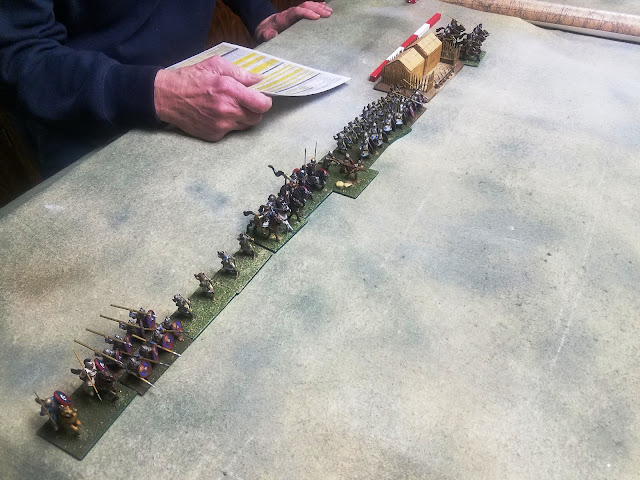
Above, the Romans deployed for battle.
Above, the Huns deployed for battle. Note that both armies are deployed on a ridge with a valley in between.
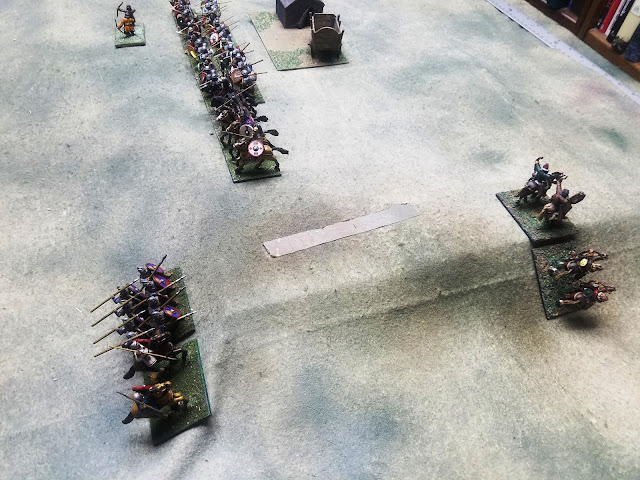
The Huns advance: the skirmishers in the center, & the Hun light horse on both flanks, with Herul heavy cavalry supporting the right flank (top of photo).
The Mounted Foederati charge the Hun light horse, but they evade to the rear. Note the Roman Auxilia Palatina with rear rank of supporting archers to the left next to the camp.
After some ineffectual shooting, the Hun light horse on the left flank (lower right) evades from the Roman legionaries and Equites Illyricani. In the center, a Hun skirmisher has taken a hit from the Roman heavy artillery. Next turn, a second hit destroyed it.
The Hun cavalry on right flank fight the Roman mounted Foederati. The Huns have lost a light cavalry unit.
The Foederati follow up and knock out a Herul Heavy Cavalry unit.
The Hun archery fire on the left continues to be ineffective, and the Roman aggressiveness caused the Huns to evade further.
However, the Hun light horse turns around surprise charges the Roman legionaries and Equites Illyricani, with a Herul heavy cavalry in support, striking the Legionaries in the flank. Both Roman units are destroyed in the ensuing combat.
With 2 mounted units lost on the right flank, the remaining Hun flees (evades) with one Foederati in pursuit, while the other attempts to rally from it's losses.
The Hun light horse evades further behind the exposed Hun camp. A Goth heavy swordsmen unit turns to face the Foederati.
The Huns rush a Herul heavy cavalry unit and a light infantry skirmisher to the rear to support the Hun light cavalry unit.
The left flank Huns rush forward & resume harassing the Roman right flank, inflicting a hit on the Roman light infantry.
The Foederati unit halts their pursuit and attempts to get away from the Hun cavalry, but they are blocked by the Goth infantry threat zone. Meanwhile, the other Foederati unit has fully recovered and is moving towards the Hun line.
On the left, Hun bow fire kills a Roman skirmisher unit.
The Foederati heavy cavalry that was trying to escape is destroyed by the Goth infantry.
The second Foederati makes a suicidal charge into the Goth infantry and becomes disordered after the first combat round.
The Foederati is finally destroyed after being flanked by the Heruls. This action finally caused the Romans to break.
Ellac and the rest of the Goth battle line looking on.
The Roman Auxilia Palatina look on in defeat.
The battle was close until the end. Both sides spent their command points on the flanks, with not much action in the center. In ADLG, the quality of a general determines what kind of command points can be generated. After killing one skirmisher unit, the Roman artillery had no other targets for the rest of the game.


Thanks, your article has reminded me that I should bring these rules to the table, a 100 points looks like it would give a good intro game while including all arms.
ReplyDeleteYes, a 100pts is a good way to learn ADLG. We have to get used to the differences between ADLG & DBA. The increased size of infantry units looks better too.
ReplyDeleteI've played a bit of ADLG and, while it isn't my preferred rule set and there are a few things I don't like, overall the games have been fun. I quickly discovered that artillery is a liability, especially if you are deploying second, as its inability to move (from memory I think it can pivot) means it's very difficult for it to repay the investment.
ReplyDeleteDBMM100 is also similar in size (allowing, as you say, for the fact that a non-light foot element in ADLG looks like a double element in DBx. Probably about 80 AP in DBMM. Strangely, DBA never grabbed me although I enjoy reading people's game accounts.