Friday, March 27, 2015

British Colonial Battle - The Sudan 1880's

In the dead of winter in January a couple months ago, we decided to warm up with a British Colonial battle in the Sudan, the Dervish (the 19th century version of ISIS) versus the Anglo- Egyptian-Sudanese. Our friend Bill Garrett hosted the game at his home on the frozen tundra near Rockford IL. Geezers present were Bill, Mike Zamuda, and Mike Beers (the Anglo/allies) while the dervishes were played by myself, Ken Kaergard, and Bob Pavlik. The rules used were "The Sword & The Flame."

The Egyptians & Sudanese were defending a fortified town, hoping to hold out long enough for a British relief column to save them. The Dervishes were commanded by that infamous radical sheik, Persian carpet cleaner, and Mahdi wannabe: Howya-Bin-Duke.

The Dervish army approaches the town. Howya-Bin-Duke (foreground) is blessing the troops and cursing the enemy.

The Egypto-Sudanese troops rush to the defense. A sandstorm is blowing off the table in the distance.

The Dervishes approaching the fort, Egyptian artillery support.

The Dervish assault begins.

The Dervishes are swarming the walls. Promises of many virgins are awaiting them in paradise.

The defenders are determined to hold. After all, they want to keep their heads!

The sandstorm clears and the Dervishes react to the British relief column now in view. The Dervish artillery changes facing, while Dervish horsemen approach the infidels.

Howya-Bin-Duke directs the final assault, the sandstorm returns, and the Dervishes fade away.

What Good Are Psiloi in DBA 3.0?

What Good Are Psiloi in DBA 3.0? That was the question posed to us by our good friend, "Uncle" Duke Seifried after the release of the DBA 3.0 rules. Uncle Duke, of course, is known for turning the 12 element game of DBA into DBE (De Bellis Extravaganza), a monster game of epic proportions. 

After some thought, below are listed some of the things Psiloi can do in DBA 3.0:

* Psiloi are the only troops that can interpenetrate. This means they can be used as a screen in front of the main battle line and fall back through it.

* Psiloi are the only infantry that can make a subsequent move during a bound.

* Psiloi are fast foot, moving 3 base widths.

* Psiloi are not effected by bad going terrain. 

* Psiloi cannot be corner overlapped in close combat - in straight up melee they always fight at +2. However, they are still effected by flank/rear edge overlap by enemy elements.

* Psiloi cannot be destroyed in frontal combat by heavy infantry - they flee instead.

* Pikes & Warband do not get a rear rank bonus against Psiloi, therefore Psiloi usually fight them +2 vs +3.

* Psiloi can "quick kill" elephants in melee - they destroy them if they beat them by just 1 pip. However, the psiloi fight elephants at +2 vs +5, so this isn't easy, unless the psiloi also has overlapping friends.

* Tactically, I believe they are useful on the flanks supporting cavalry, where they can be used to interpenetrate and flank the enemy, and able to run for cover in bad going using regular or subsequent moves. They are also useful for harassing the enemy out of bad going.

* Enemy pike, blade, & spear do not pursue Psiloi when beaten in close combat.


Thursday, March 26, 2015

Invasion of Britain, a DBA After Action Report, Part 2

In Part 1 (click here) the invasion of Britain got off to a bad start for the Romans, who were licking their wounds after their disastrous first encounter with the Britain's. What caused such crippling casualties to the heavy infantry Roman legionaries by a bunch of half naked guys in colorful rags?

In the DBA 2.2 version of the rules, Roman legionaries (blades) were allowed rear support by a psiloi element when a psiloi was directly behind a blade, or directly behind a line of blades and within 2 elements. Thus a single psiloi element could support at least 4 blades with a +1 to their combat factor. Therefore, blades could fight at +6 instead of the regular +5. The best base combat factor warband can get against blades is +4, though all warband need to do is beat the blades by +1 to destroy them. Additionally, blades in 2.2 did not make pursuit moves after combat if they recoiled or destroyed the enemy, which usually meant blades maintained an unmovable line.

In DBA 3.0, combat for blades has changed. First, there is no rear support for blade elements; they fight at a consistent +5, unless in bad going. Second, blades must now pursue enemy foot other than psiloi if they are recoiled or destroyed. This fact means that if a blade pursues an enemy, it can possibly advance into a position where either/both flank edges are overlapped by enemy, lowering their combat value to +4, or even +3. Finally, warband can still "quick kill" blades in 3.0 as in 2.2 by merely beating the blades by +1, which is now easier to do. However, the warband must fight in 2 rank formations to get +4, which in turn, reduces their army frontage and makes their flanks more vulnerable in the game.

Falling back towards Dubra, Caesar rallied his army, brought up reserves, and moved to confront the pursuing Britain's. The army composition for both sides was basically the same as before. (Bob & I were playing matched pairs, so we exchanged armies to see who could do better.)

Above shows the pre-battle deployment. As in the first game, the Britain's were the defenders and chose/placed the terrain: 2 compulsory plough, and 2 optional pieces: a woods and a gentle hill. The Romans (on the left) deployed in a long line, cavalry on the left flank, light infantry on the right. The Britain's (right) deployed with their chariots and light horse in a single group on the left flank, while the warbands were in a single group on the right near the woods, with a single psiloi element in the woods. 

As will be seen, this deployment for the Romans was probably an error; their light infantry was facing the Britain's chariots and light horse on an open flank, while the Roman cavalry on the left was restricted by the woods in front of them. The Romans should have placed their cavalry on their right flank and the light infantry on the left. Also, the far right Romans were out of command distance from the mounted general (command distance is 8 base widths), further causing the Romans problems, requiring extra pip expenditures to move their right flank troops.

Above shows the end of turn 2. The plough terrain is good going again. The Romans, to compensate for their weak right flank, have advanced but shifted their line in that direction using many pips. The 3 groups of Britain's are cautiously moving forward together. Note that the British light horse is in 2 ranks and has rear support like the warbands.

At the end of turn 4 above, the Britain's have launched their mounted troops at the Romans and both sides have lost elements: the Romans a psiloi and the Britain's lost a chariot. A gap has developed between the Romano-Gaul auxilia and the legionaries.

Above shows the end of turn 5. The Romans have stabilized their line and destroyed another enemy chariot. The Romans lead 2-1. However, the Britain's light horse is close to working around the Roman right flank, and a group of 2 warbands has joined the British general in his chariot in the center.

The end of turn 6 above shows that the Romans have advanced across the table center line, engaging the warband and general in the center. The Romans are also bringing their cavalry into a position to attack the warband near the woods. However, there is still an opening for the British light horse on the Roman right. 

Above shows the end of turn 7. The Roman cavalry and a blade have engaged the warband near the woods, with the Romans losing a cavalry element. The British psiloi has advanced out of the woods to support the warband. In  the center the Romans lose a blade, quick killed by the warband, while another blade counter-attacks. On the Roman right flank, inconclusive combats are going on. The Britain's are now winning 3-2.

The end of the game on turn 8 (above) shows that the Romans have lost another blade in the center. The Roman cavalry near the woods has repelled a flanking attack by the warbands, and the Romano-Gaul auxilia has caused an element of British light horse to flee (below right). The Britain's win 4-2.

The jubilant British camp celebrate victory.

Caesar & Rufio leave the field dejected, embarking at Dubro for better campaigns in Gaul.

Monday, March 23, 2015

Invasion of Britain, a DBA After Action Report, Part 1

My friend Bob & I resumed our mostly weekly dining-room table wars, this time with Caesar invading the British Isles. We are again using the DBA 3.0 rules and armies for our games.

Landing near Dover (Dubra), Caesar's forces, tired of sea-sickness on crowded galleys, disembarked and moved inland to seek out the Britain's.

Above is the Roman invasion force (all miniatures are Old Glory 28mm). Their army composition is as follows:

3 x Cv (Cavalry, one is the general)
7 x Bd (Blades, Legionaries)
1 x Ps (Psiloi)
1 x 3Ax (Fast Auxilia, Gauls)

The Britain's were assembling nearby.

Above, the various tribes of Britain's have gathered and are ready to meet the invaders. Their army composition is as follows:

3 x LCh (Light Chariots, one is the general).
6 x 3Wb (Fast Warband: we used 4/stand instead of 3, warriors)
2 x LH (Light Horse: cavalry with 3/stand represent the light horse)
1 x Ps (Psiloi)
1 x camp followers (alcoholics mostly, no screaming women, no animal, human, or other sacrifices).

The Romans moved inland trying to find some decent food to eat (probably fish & chips, as Caesar's commentary indicates he was getting tired of spaghetti). We understand that finding decent food can be a challenge today in Britain. Near modern day London, a detachment of Romans under Rufio encounter some massed British tribes under their chieftain, Cassivellaunus.


Above, both armies have deployed before the battle begins. The Romans (left) have deployed with a line of legionaries, with 2 cavalry on the left flank, and the auxilia and psiloi in the woods near the right flank. The Roman cavalry/general and a blade are in reserve. The Britain's (right) have deployed in two groups: the warbands and chariots are on the left, while the light cavalry light cavalry and psiloi are on the right. The terrain is plough, woods, and a gentle hill.


The photo above shows the end of turn 2. The plough is good going. The Britain's have advanced while the Romans shifted their general over to the left flank.


At the end of turn 5 (above), the Britain's, blessed by the gods with many pips, shifted their left flank group of warbands and chariots to the right, deciding to avoid going near the woods where their angry Gaul relatives and Roman psiloi were lurking. The Romans thought it wise to shift an element of blades to their left. 


At the end of turn 6 (above), the Romans advanced towards the waiting Britain's.


Above shows the end of the battle on turn 8. At the top of the photo, the Roman Cavalry destroyed a British light horse and psiloi while losing a cavalry element. The center was more disastrous for the Romans, as they lost 3 blade elements to warband quick kills and melee with chariots. On their left, the British lost a chariot. The game ended a 4-3 victory for the Britain's.

Caesar lamented that his left flank cavalry had not charged sooner and turned the Britain's right flank. Also, the Romans had left 2 blade elements too far in the rear to support the main battle line, where a gaping hole now exists.


Friday, March 13, 2015

DBA 3.0 Early Achaemenid Persians vs Early Hoplite Greeks Part 4

In the final contest between the Persians and Athenians, the Persians would see if they can repeat their victory after the hard lessons of the first two encounters. The Athenians would see if they can improve on their last performance. The elements used in game 3 remained the same for this battle.

Above shows the pre-battle deployment. The Athenians are the defenders again and place a waterway at the top of the picture. They also placed a dune and a difficult hill next to the waterway. (Upon further review, this placement was incorrect, as there should have been at least a one base width gap between the dune and hill.) Without helpful terrain, the Persians (left) deploy their main infantry battle line close to the camp, set back farther from the center of the battle field so that the Athenians have farther to come to engage them. The Persians also mass their cavalry on their right, along with a psiloi. The Persians also placed a psiloi and auxilia in position behind the dune on their left. The Athenians deployed their hoplites in line, anchored on the hill on the right, and placed their lone cavalry and both psiloi on the left.

Above shows the end of turn 2. The Persians pushed their psiloi and auxilia through the dune to the difficult hill on the left, threatening the right flank of the Athenian line, which had moved forward. On their right, the Persian cavalry aggressively moved forward towards the Athenian left flank; both sides shifting towards the flank edge. Note that the hoplite line has separated into 5 parts.

Above shows the end of turn 3. In a straight up combat, the Persians have destroyed the Athenian cavalry element and a psiloi. On their right, the Athenians have formed up to assault the auxilia on the difficult hill. The Athenian main line has reformed, but is now in 3 parts. The Persians are winning 2-0.

At the end of turn 4 above, the hoplites on the difficult hill have recoiled the Persian psiloi and auxilia. While there were no losses, the Athenian left flank psiloi is in a bad position for next turn.

At the end of turn 6, the Athenians have lost their psiloi on the left flank and a hoplite element. A single hoplite element nearby is unsupported and in a very bad position. The fighting on the difficult hill is inconclusive. The Persians have won 4-0.

Discussion: Again, the Persian cavalry won the day. The Athenian psiloi probably would have been better used to hold off or fight the Persians lights on the difficult hill while using the rest of the pips to counter the Persian cavalry and move their battle line forward together. The main Athenian battle line never made it past the center line of the battlefield and the Persian infantry remained un-engaged (which for them, was a good thing).

My fellow gamer & friend Bob Pavlik & I are enjoying these rules and playing these games. We are still learning the 3.0 version of DBA, and how to the armies play. There are probably some things we did wrong that we didn't catch; hopefully will be rectified in future games. 3.0 seems to be superior to previous versions of the DBA rules. It is also fun to resurrect/restore some old figures and armies and have them re-born as it were, under DBA 3.0.

DBA 3.0 Early Achaemenid Persians vs Early Hoplite Greeks Part 3

The previous two battles between the Early Achaemenid Persians and the Early Hoplite Greeks saw Later Athenian victories. The main points regarding the Athenian victories are as follows:

  • ·         The ascendancy of the hoplite battle line which was irresistible against the double element bow Sparabara and Immortal infantry.
  • ·         The failure of the Persians to mount any meaningful flanking threat to the Greeks with their superior numbers of cavalry and the restrictive nature of the terrain
  • ·         The failure of bow armed troops to inflict any meaningful effect on spear troops with individual unsupported fire.
This sets the stage for the next encounter between these two armies.

     Army Lists: 
     The Persians are list I/60c in the DBA 3.0 rules. The list allows the Persians to take either 3 Double element 8Bw for the Sparabara or fast 3Bw. The 3Bw may have been a better option in the previous games where there was more terrain. In the case of the Immortals, they Persian can take either one 8Bw double element or a 4Bw single element. The list also allows the Persians to take 3 Hordes or Psiloi as the Levy. Horde elements cost an extra pip to move, but when destroyed, do not count toward the army breakpoint of 4 elements lost. Psiloi on the other hand, only fight at +2, but are harder to kill. They flee from spear if doubled, move faster, and can fight in bad terrain. They also cannot be corner overlapped and can interpenetrate and make subsequent moves. The army list allows the Persians to take a combination of Horde or Psiloi. For the next game, the Persians decide to stay with 8Bw instead of 3Bw, but take only two Hd and add an additional Ps. The Persian starting line up for the next encounter now looks like this:

3 x Cavalry (one is the general)
3 x 8Bw (Sparabara)
1 x 8Bw (Immortals)
1 x 3Ax (Armenians)
2 x 7Hd (Levy)
2 x Ps

     The Athenians (list I/52F) look like this:

9 x Sp (one is the general)
1 x Cv
2 x Ps

For the next battle, the Athenians are the defenders and Littoral is their home terrain. A waterway is compulsory terrain for Littoral. The Athenians also chose a marsh and a difficult hill.


Above shows the game at the end of turn 2. Instead of deploying in a large main battler line, the Persians (on the left) used the terrain as much as possible. The Sparabara were placed in the marsh, where their bow fire would not be effected and their movement slowed, but is a better place to be against hoplites, who take a -2 if in close combat in bad going. The Immortals and the Armenian auxilia were placed near the difficult hill, where they have the same protection against hoplites, and the additional advantage of +1 if higher than their opponent. The Persians have also massed all their cavalry on their far right flank, while the psiloi are operating along the waterway near the marsh. The hordes are covering the camp. The Athenians have formed another long main battle line, with their sole cavalry on the left flank and psiloi along the waterway on the right.


Above shows the end of turn 3. The Persian cavalry has deployed into line. The Athenian cavalry has moved into a supported position on their left. The Athenian battle line has not moved forward yet.


Above shows the end of turn 4. The Athenian battle line has held stationary due to the threat on their left, while the Persian cavalry has attacked the Athenian left flank cavalry, recoiling them. Near the waterway, the Persians got lucky and destroyed one of the Athenian Psiloi. The Persians are winning 1-0.


Above shows the end of turn 5, where the Athenians are in serious trouble. The Persian cavalry has destroyed the sole Athenian cavalry unit and a hoplite element. Good die rolls helped. The Persians are now winning 3-0.


Above shows the end of the game on turn 6. The Persians have destroyed another hoplite unit with their cavalry and the game ends, a 4-0 win for the Persians. 

Discussion: The Athenian battle line never got going forward and all the pips were spent on the flanks. The Persian infantry never really got involved, but they were in much better positions. The Persian cavalry won this battle. If the Athenians had concentrated all their command pips on the Persian cavalry, they might have had a better chance, as the Persian infantry was not about to move out of their defensive positions.


Thursday, March 12, 2015

DBA 3.0 Early Achaemenid Persians vs Early Hoplite Greeks Part 2

The Persians fought a rematch with the Athenians. As in the first game, the Persians again were the defenders in spite of their higher aggression, and placed terrain accordingly. The Persians defend in Arable terrain, which means they must place either 1 Built Up Area or 2 plough as compulsory terrain pieces, and 2-3 other optional pieces. The Persians placed 2 plough and 2 scrub (rough going) pieces as shown. Neither side changed their allowed elements and used the same mix as before.

Above shows the starting deployment. The Persian main battle line on the left has Levy Horde in the center, flanked by Sparabara and Immortals. A cavalry element is on each wing, and the general and an allied hoplite element are in reserve. The Athenians deployed in a long line, with psiloi on each flank, and a reserve of hoplites and a cavalry element. The initial Persian pip die didn't effect the plough, so it remained good going.

Above shows the end of turn 1. The Athenian hoplite battle line advances. The Greek cavalry reserve moves towards the right, as Persian cavalry is heading that way, rounding the scrub on the flank. A Persian auxilia element has moved into that scrub. On the Greek left, another Persian cavalry element was approaching the scrub on that flank.

Above shows the end of turn 2. Low pips have slowed both sides, but the Athenian cavalry is now facing off against the Persian cavalry on their right flank as it comes round the scrub.

Above shows the end of turn 3. The Athenians have moved both psiloi and their sole cavalry element squarely into the threat zones of their Persian opponents, restricting their opponent's ability to move. The Persian elements in question only option is to either spend pips to move forward to attack, move straight back, or sit where they are. In the mean time, the Athenian hoplite battle line has resumed moving forward. Persian bows are now in range, but have had no effect in distant shooting (2 x 8Bw elements shooting with one support each vs. hoplites is a +2 for the bows vs +3 for the spears).

Above shows the end of turn 4. Low pips have again hampered both sides, but the Greek psiloi in the scrub on their left has recoiled the Persian cavalry element facing it. Persian bows still are having no effect in distant shooting.

Above shows the end of turn 5. Quite a lot has happened. In the scrub on their right, the Athenians moved a hoplite element to support the psiloi, recoiling the Persian auxilia there. In the center, the Athenian hoplite phalanx has crashed into the Persian main battle line. In the resulting melees, 2 Persian Levy Hordes and 1 Sparabara were destroyed. The third Persian Levy horde was beaten, but not doubled by the Athenians, so no result. The Sparabara elements on each flank were recoiled. Only the Immortals stood firm. The Persian right flank cavalry recoiled the Athenian psiloi in the scrub. The Athenians are winning 2-0 for killing the lone Sparabara (the first double element lost counts as two lost), the Levy Horde not counting as casualties against the Persians.

Above shows the end of turn 6. The Athenian hoplite center has destroyed a third Levy horde (not counting against the Persians) and an allied hoplite and the Immortals. The Athenians are now winning 3-0. The Athenian psiloi in the scrub at the top and bottom of the picture have both been recoiled or flee. The Persian center is gone and the way to the camp is open.

Above shows the end of turn 7. The Athenians destroy another Sparabara with a flanking hoplite on the Persian right. An Athenian Psiloi is lost attacking the Persian auxilia in the scrub at the top of the photo, even with support from an overlapping hoplite. The Athenians win the battle 4-1.

Discussion: The Persians were not able to delay the main hoplite battle line from closing for long, and their attempts to turn the Athenian flanks were too weak and were mostly countered. The terrain may have also hurt the Persians in this regard. The Persians will need to re-evaluate their choice of elements and terrain placement (though most was placed randomly).

Monday, March 2, 2015

Big Battle DBA 3.0: Romans vs Gauls

Two weeks ago we had a Big Battle DBA 3.0 game of Marian Romans vs Gauls at Liberty Hobby Center in Wheaton IL. Liberty Hobby Center is the new home of Thistle & Rose Miniatures. The players were Bob Pavlik and Bill Hupp (Gauls) vs Brian Caskey and John Brust (Romans).

The game used standard BBDBA rules and 36 element armies (three 12 element DBA armies).


Above, the armies are deployed. The terrain was placed per the DBA rules, but the larger playing surface spread it out.


Above - Another deployment photo.


Above - The battle lines are closing. The Gauls are in 2 ranks, because warband in 2 ranks get a +1 vs enemy foot.


Above - The battle lines have clashed.


Above - The Gauls have broken the Roman right flank command, the warbands "quick killing" several Roman blade elements. Note the legionaries turning away. The Gallic cavalry in the center is locked in a desperate combat. The Gallic right flank is barely hanging on.


Above - The Gallic right flank command has broken. What happens in the center will decide the battle.


Above - The Gallic cavalry is decimated, their center command finally breaks, and the Romans win the battle. The game played in about 2 hours.


DBA 3.0 Early Achaemenid Persians vs Early Hoplite Greeks Part 1

Over Christmas and January, I re-based some old Ral Partha miniatures for DBA 3.0: Early Achaemenid Persians and Early Hoplite Greeks. I have enough to do any army in the lists. I finally got to use them & see how they fare against each other.

The order of battle was as follows:

Early Achaemenid Persians I/60c 539-420BC:
1 x Cv (General)
2 x Cv
3 x 8Bw (Sparabara)
1 x 8Bw (Immortals)
1 x Sp (allied hoplites)
1 x 3Ax (Armenians)
3 x 7Hd (Levy)

Early Hoplite Greek - Later Athenian Hoplite Army I/52f  540-449BC
1 x Sp (General)
8 x Sp (hoplites)
1 x Cv (Thessalians)
2 x Ps (javelinmen & bows)


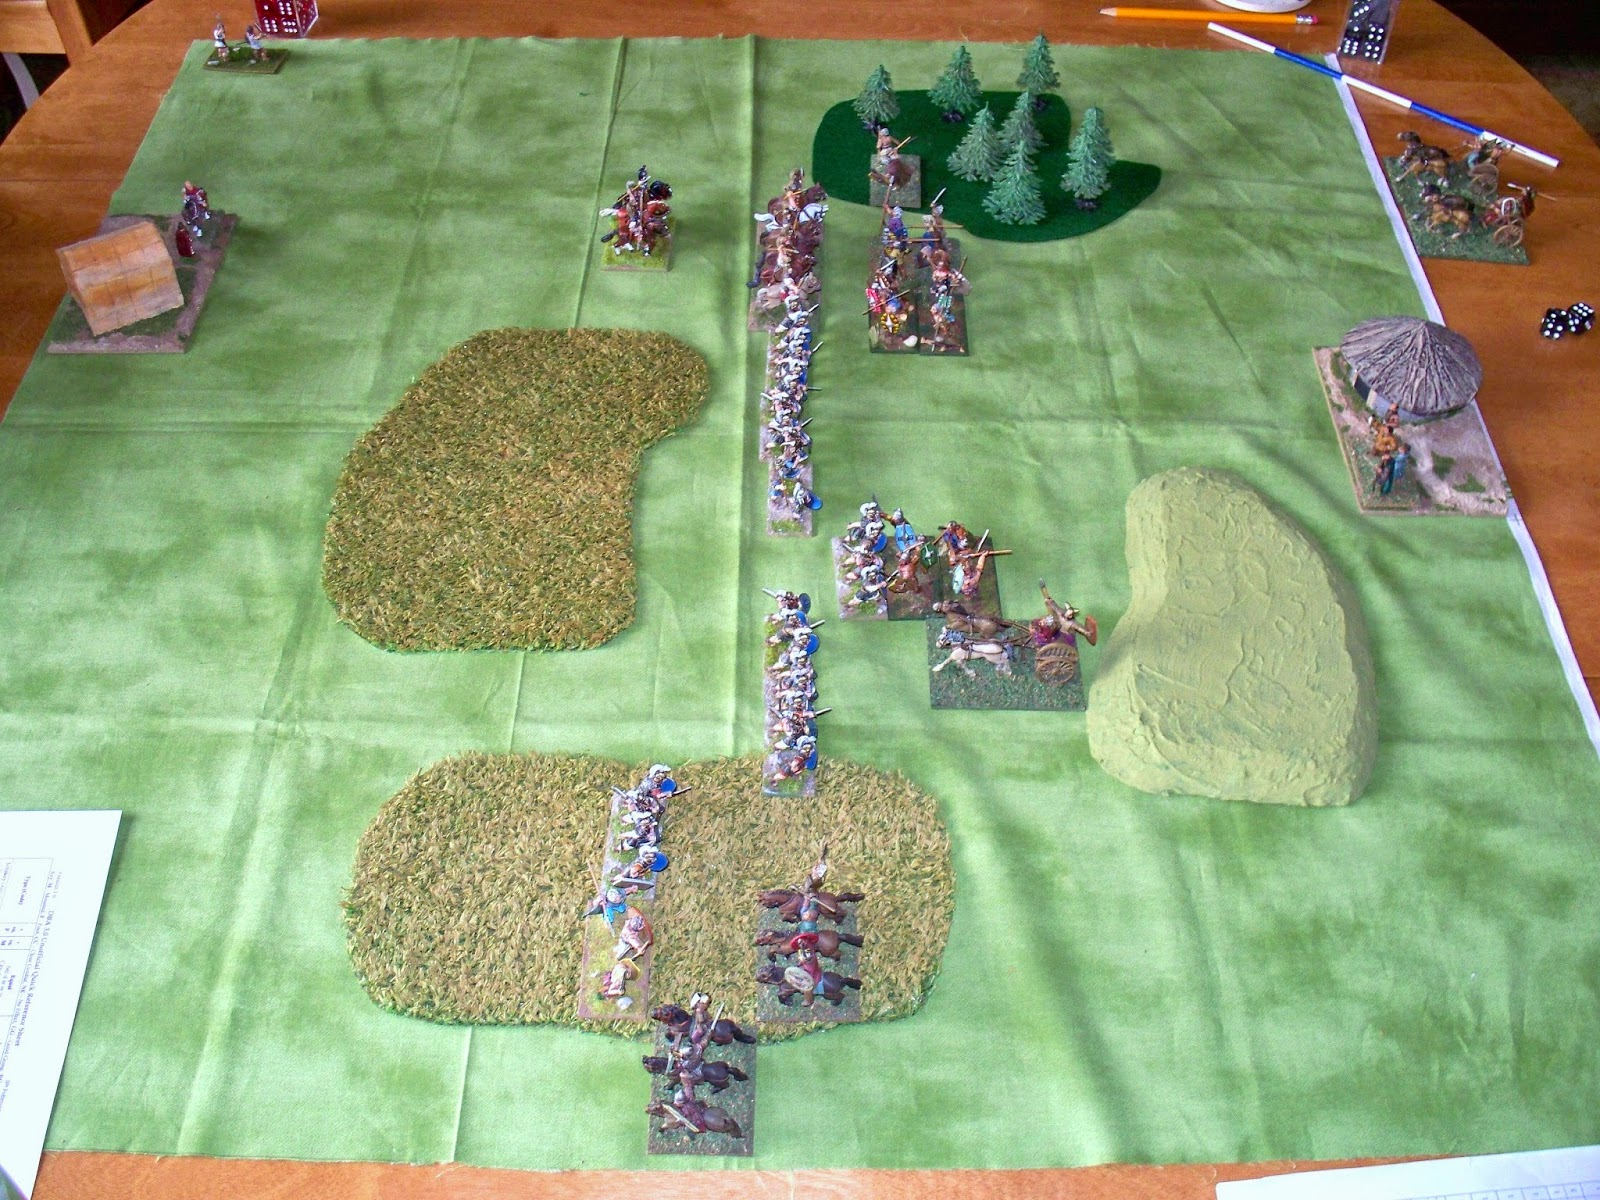
Above is the deployment. The Athenians were the attackers. The terrain features included two plough, and single scrub and woods areas. The Persians (left) deployed with their sole hoplite element in the front center, flanked by Sparabara and Immortals. Armenian auxilia was on the right, and Persian cavalry near both flanks. Levy horde infantry is in the rear. The Athenians deployed with hoplites in line, with psiloi on each flank. The General's element, another spear and a cavalry element formed a reserve line. Camps for both armies are in the center, rear (Roman & Gallic camps until I build Greek & Persian ones).


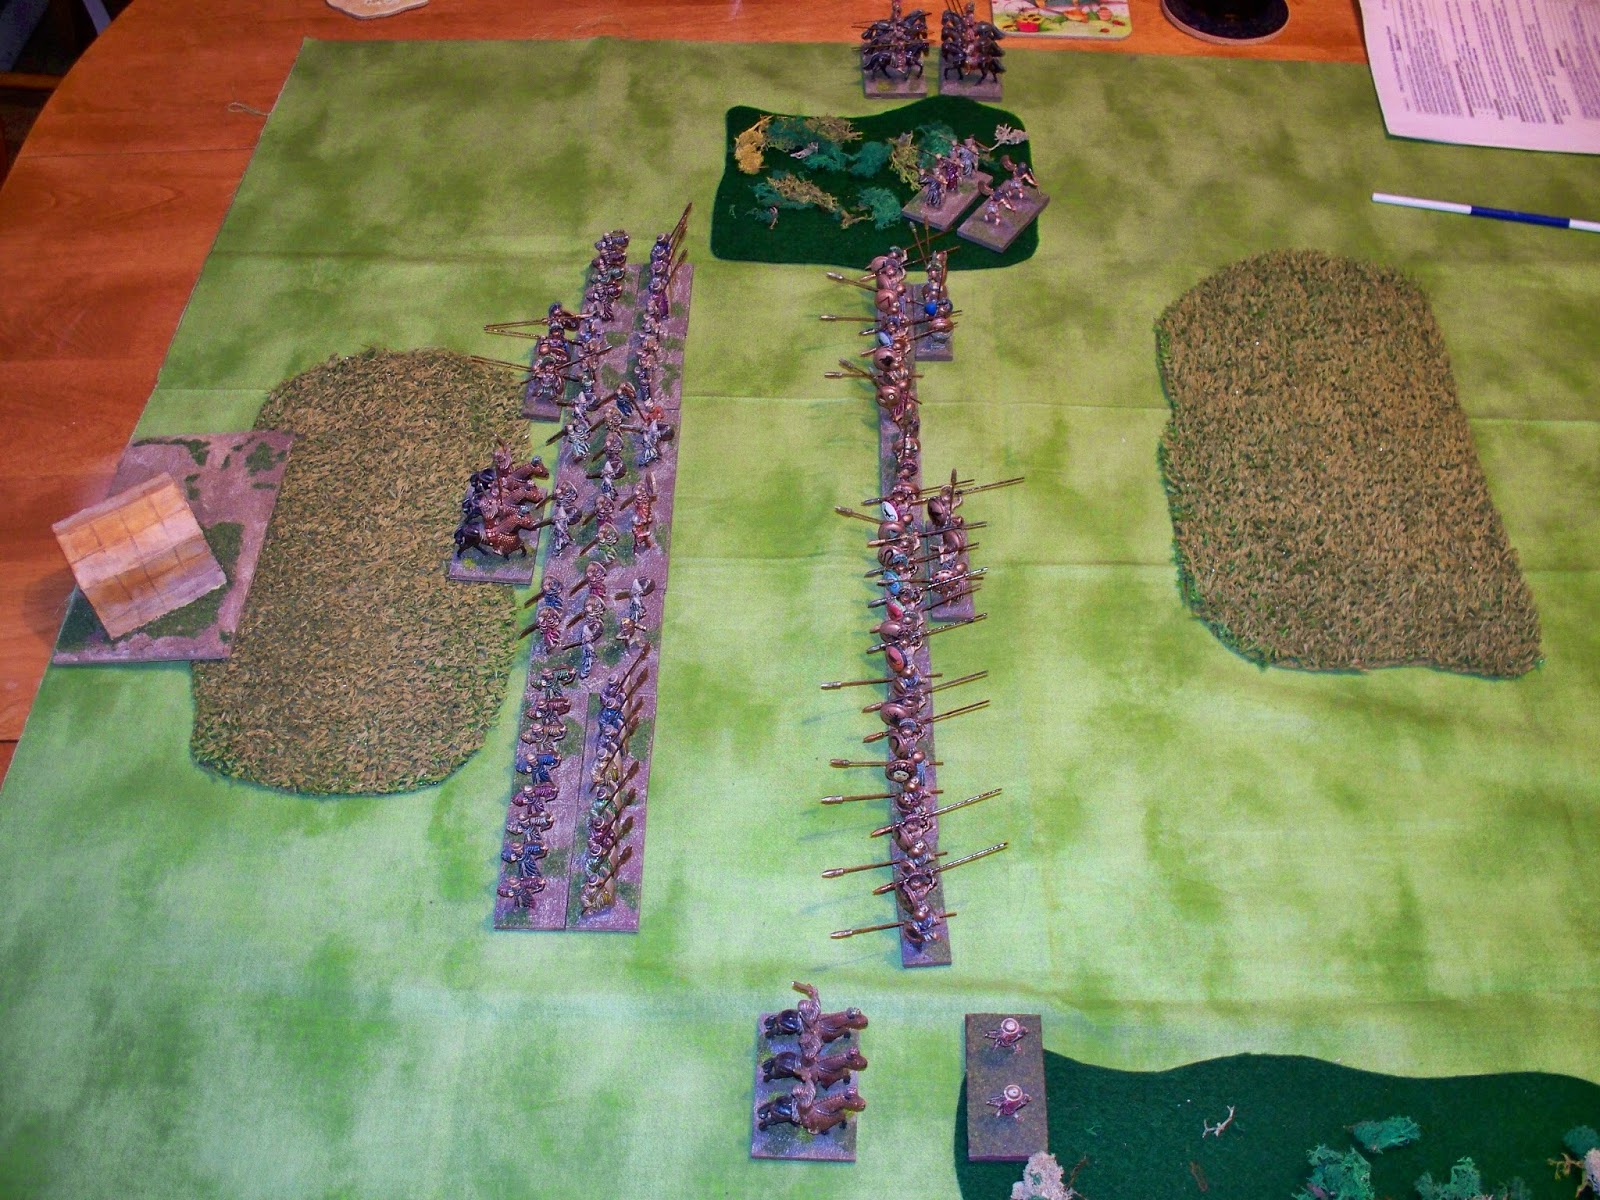
Above shows after turn 1. The Persians moved first, the plough was good going based on the Persian's first pip roll. The Persians moved their Armenians into the scrub on their right flank, moved cavalry up to cover both flanks of the Sparabara (and a horde element behind the cavalry on the left). The Athenian hoplite line moved forward, with the psiloi moving to both flank terrain pieces.


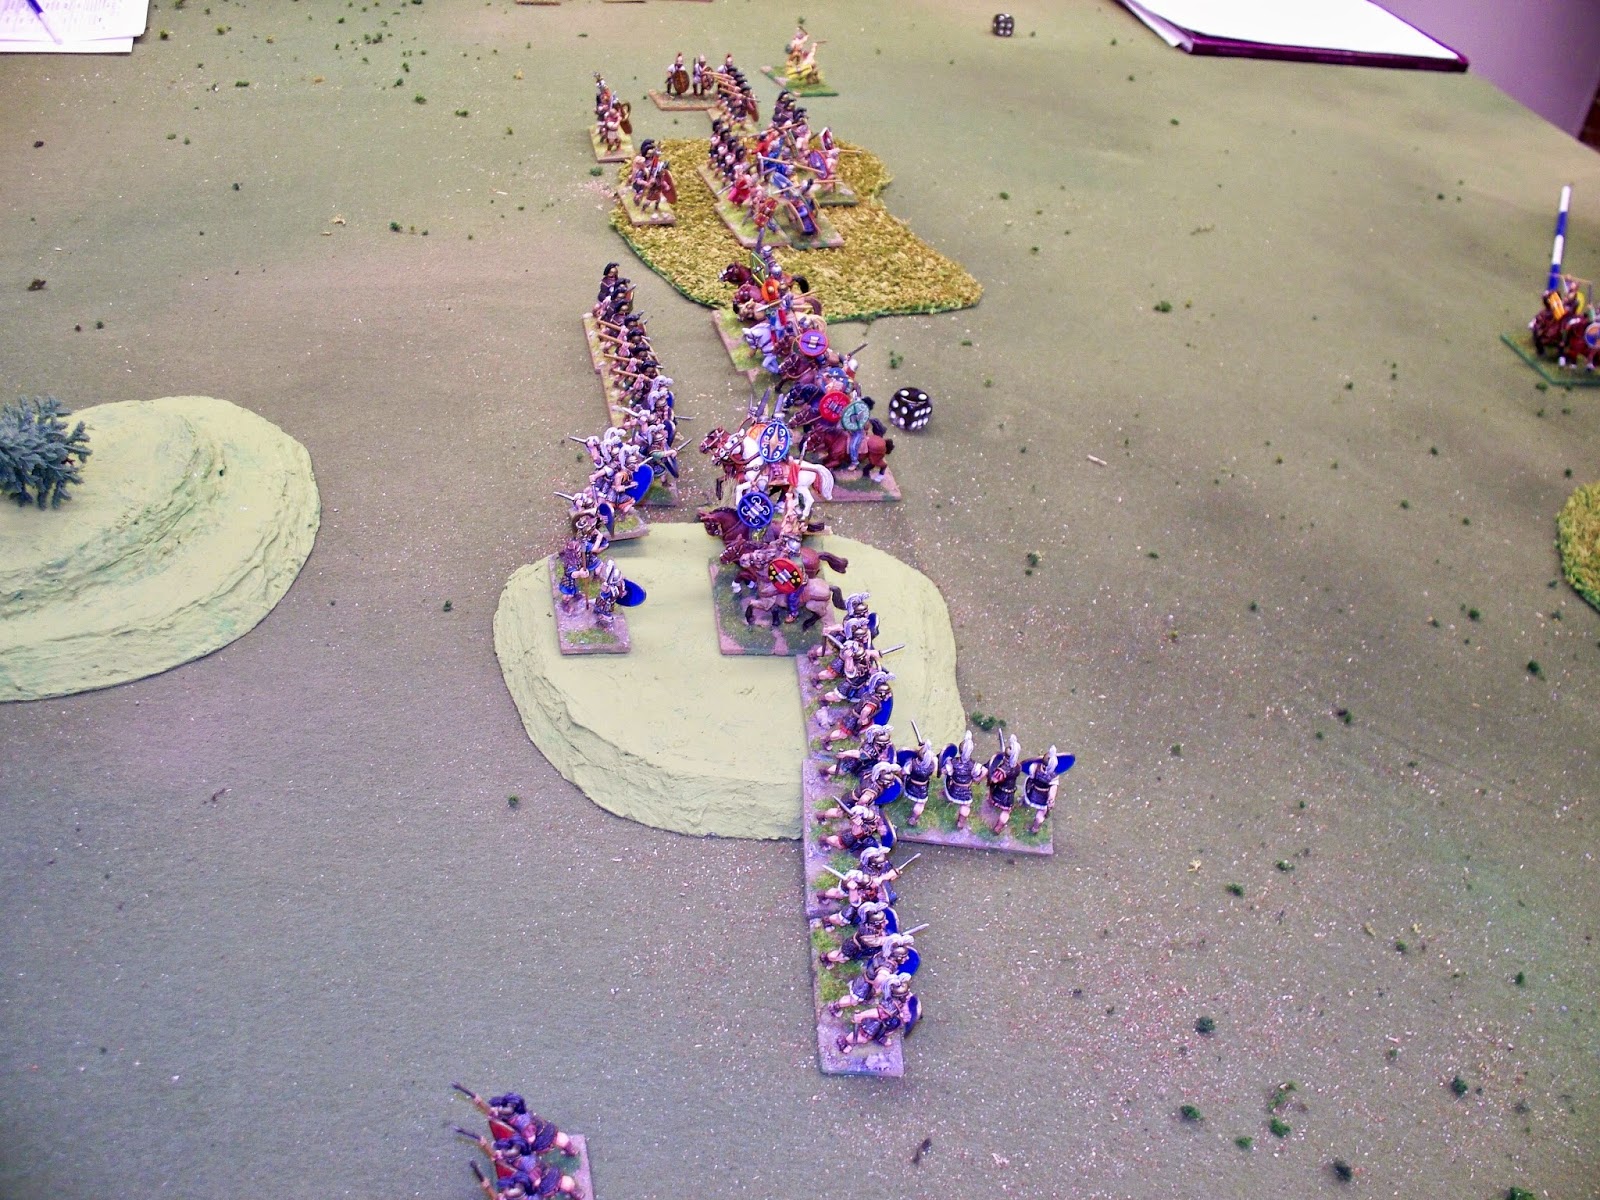
Above shows after turn 2. Persian distant shooting was largely ineffective, as no hoplite recoils are seen. The Persian auxilia and Greek psiloi are facing off against each other in the scrub below. The Athenians have moved their lone cavalry to support the psiloi on their left.


Above shows after turn 3. The Armenian auxilia has destroyed the Athenian psiloi in the scrub. The Thessalian cavalry has moved up to prevent a flanking move by the Armenians. On the Athenian right, the Athenian psiloi bows are in the wood; the Persians moving a horde element to block them from exiting. The Persian distant shooting is still not effective as no recoils are seen.


Above shows after turn 4. Persian distant shooting by the Sparabara and Immortals did recoil a couple hoplite elements in their bound, but pips allowed the Athenians to reform their line and advance closer to the Persian line.


Above shows the end of turn 5. The Athenian line crashed into the Persian line. In the ensuing melees, a double Sparabara element was destroyed (gap in the line above), and all Persian infantry has recoiled from the Athenians, with a single Persian cavalry element still locked in melee. The first double element lost counts as 2 lost, the Athenians are winning 2 to 1. Hoplites (spear) get a +1 for flank support by another spear element, which simulates the shield wall of the phalanx.


Above shows the end of turn 6. The Athenians have destroyed the Immortals double element, creating a larger gap in their line, necessitating the Persian General's cavalry element to cover the gap. 3 Athenian hoplite elements have recoiled from distant shooting or melee. The Athenians are now winning 3-1.


Above shows the end of the game on turn 7. The Persian allied hoplite in the center has been destroyed, taking the Persians to 4 elements lost and ending the game. The Armenians unsuccessfully tried emerging from the scrub to attack the Thessalian cavalry (below).

Post Game discussion: The Athenian hoplite battle line proved very tough, fighting melee at +5 with flank support. The Persian distant shooting was largely ineffective, as they shot singly at hoplite elements instead of concentrating fire on one or two. It should be noted that the Persian horde suffered no losses, fight foot at +3, and when destroyed they don't count towards losses for victory conditions. In the next game, the Persians may want to put the horde in the front line to absorb losses while the Sparabara concentrate fire. Also, the terrain on the flanks restricted the Persian cavalry from taking advantage of their numbers vs the Athenian cavalry (3 to 1) and made it difficult for the Athenian hoplite battle line to be flanked .