I just finished some 1st Corps 28mm Thureophoros & Thorakitai to fight alongside my Thracians in ADLG & DBA. I purchased the miniatures from Mark Severin at Scale Creep Miniatures, who gives good service. The figures were very nice, with little flash.
The Thureophoros are on the left, while the Thorakitai are on the right. The difference between them is that the Thorakitai are wearing mail shirts, while the Thureophoros are unarmored. I based the figures as 4Ax for DBA. They can also be used as Medium or Heavy Spearmen for ADLG. For ADLG, note that the rear rank have the long thrusting spears, while the front rank are throwing javelins, which I think pretty well shows how they fought historically.
All the figures with spears are cast with butt-spikes. The Thureophoros are slightly more animated than the Thorakitai, but I am pleased with both types. These troops were typically mercenaries found in late Hellenistic & Successor armies, but were also found in Late Republic Roman & Pontic armies.
Wednesday, June 8, 2016
Tuesday, June 7, 2016
Old Glory Thracians
I just finished painting a bag of 30 Old Glory 28mm Thracians. Now I have Thracian units for ADLG and enough elements for a Thracian DBA or BBDBA army where the Thracians were auxiliaries.
I based them 3 to a base. In DBA, Thracians can be 3Ax or 4Ax. I decided to base them all on 3 figure bases and designate certain elements (the white theuros shields) as 4Ax when needed. The figures are nicely animated, some of Old Glory's better figures.
As you can see from behind, the Thracians have crescent shields of various designs, as well as ochre & white theuros shields.
I based them 3 to a base. In DBA, Thracians can be 3Ax or 4Ax. I decided to base them all on 3 figure bases and designate certain elements (the white theuros shields) as 4Ax when needed. The figures are nicely animated, some of Old Glory's better figures.
As you can see from behind, the Thracians have crescent shields of various designs, as well as ochre & white theuros shields.
Monday, May 30, 2016
Jutland Re-fight - The 100 Year Anniversary Game
12 guys got together over Friday & Saturday May 27-28 to re-live history and re-fight the greatest naval battle of World War 1, the Battle of Jutland in miniature. The game was held at a machine shop in Gilberts IL, and fought on three large tables set up in the loading dock area.
The model scale was 1/2400, the rules used were General Quarters.
Beatty and Battle-cruiser force chased German Battle-cruiser's south as per script. Less than expected damage was exchanged back and forth until near the furthest south, the Battle-cruiser New Zealand exploded. About that time the accumulated damage on the British Battle-cruiser's had impaired speed and function to the point Beatty had some real concerns about getting out as he turned north.
British cruisers further north contained the outnumbered German cruisers who where obliged to withdraw following the German Battle-cruisers. This limited German scouting range (which would have pushed the Grand Fleet's eventual entry further north).
The model scale was 1/2400, the rules used were General Quarters.
Above-The players
Below is a synopsis of the battle. Further down are many more photos.
British cruisers further north contained the outnumbered German cruisers who where obliged to withdraw following the German Battle-cruisers. This limited German scouting range (which would have pushed the Grand Fleet's eventual entry further north).
At this juncture the High Seas Fleet put in its appearance to the south and Beatty went into flee mode--with some ships only making 9 knots.! The intact British fast Battleships supporting Beatty moved forward to cover his retreat. German torpedo boats made a run to hit Beatty but got fairly shellacked by secondary fire in full daylight, forcing them to withdraw.
As Beatty withdrew under the cover of his fast BB's, the German main body turned its vanguard west to line up shots against the British. I think this was the mistake that cost the Germans any chance of decisive victory (small though that may have been). With the British limping away the German main battle line could have overhauled them by steaming a parallel due north and over matched them with their massive firepower advantage. Instead the Germans only managed to engage Beatty with a small potion of their line and threw a kink into their battle line that delayed them getting north in a hurry.
The Germans eventually turned the line back north and then went defensive, maneuvering to the NE awaiting the approach of the Grand Fleet. The German scouting cruisers turned back north and tried to force their way past the British screen. In the tussle two British cruisers were sunk with one German left with a jammed rudder. The eventual appearance of British Battle-cruiser's and Battleships from the north forced the crippled German cruiser to scuttle. But the German scouting dash did succeed in pushing the British entry point back.
While the British Fast Battleships exchanged shots with the Germans at range, the Grand Fleet closed up in 6 columns. The Grand Fleet closed up to within 18,000 yards and formed a battle line facing SW. This matched the Germans who turned their entire fleet into a line facing SW as well. Both sides began slugging it out. A German pre-dreadnought in the rear of the their line suffered two magazine explosions from a single British ranging shot and exploded without a trace.
After a few turns of gunnery exchange we were left with 10-15 turns left till darkness (we had played about 40 turns). The Germans were pulling back to the south firing concentrated volleys, while the British were maybe three turns away from having all their capital ships in line and shooting at effective ranges. Here the game ended.
At the end of the game Germans may have been slightly up on points. But I have to believe that in the next ten turns before darkness the score would at least be evened out by British numbers. The German pre Dreadnoughts were particularly vulnerable at this stage. At nightfall the British would have been forced to pull back for fear of torpedo boat attacks.
Admiral Hipper's German Battle-cruiser squadron was particularly resilient throughout the battle. The Germans were able to repair most of the damage the British inflicted and was still going strong at the end without any losses. They fought off the British Battle-cruisers and then led the British Fast Battleships on a merry chase.
If we had played it out I think we would have seen a small British victory on points. If the Germans could have sunk more Battle-cruisers earlier on they might have easily had a win on points.
Above-The German High Seas Fleet making unusual maneuvers....who was responsible for that? Hmmm. The ships are making coal smoke at high speed.
Above-Another view of the German fleet heading north.
Above-Part of Admiral Beatty's British Battle-cruiser Fleet.
Above-Beatty's Battle-cruiser Fleet, under heavy German fire, entering a squall.
Above-The British ships speeding up, making smoke. Note shell splashes from German firing.
Above-The main body of the British Grand Fleet enters the fray.
Above-Seeing the approaching main body of the Grand Fleet, the German Fleet has executed a "Gefechtskehrtwendung" or "Battle Turn-Away." The fast battleships of Beatty's fleet are in the foreground, but destroyer smoke is preventing them from shooting.
Above-The height of the battle.
The British players celebrated the game with one of the traditions of the Royal Navy, rum. The Germans drank beer.
Thanks go especially to Mark Huml & Ed Harding for all their hard work in making this event possible.
Saturday, May 14, 2016
DBA 3 Sumerians
Bob & I played a couple DBA 3 games this week with his cool 28mm Sumerian armies. These are the oldest armies in the DBA rules. Bob painted these figures years ago & this was their very first game. Both armies were identical. The armies consisted of pikes, auxilia, psiloi, and heavy chariots - actually, equine battle cars. Bob has enough unpainted figures to do other, mostly infantry Sumerian armies, and may be motivated after these games to finish them all. King Sargon (center photo below) looks perplexed.
Thursday, May 5, 2016
Giant DBA: Battle of the Sabis (Sambre) 57 BC
We tried another Giant DBA scenario last Wednesday, the Battle of the Sabis (or Sambre), 57 BC. In this battle, Julius Caesar defeated the Gallic Belgae tribes. We recreated the battle for Giant DBA 3.0.
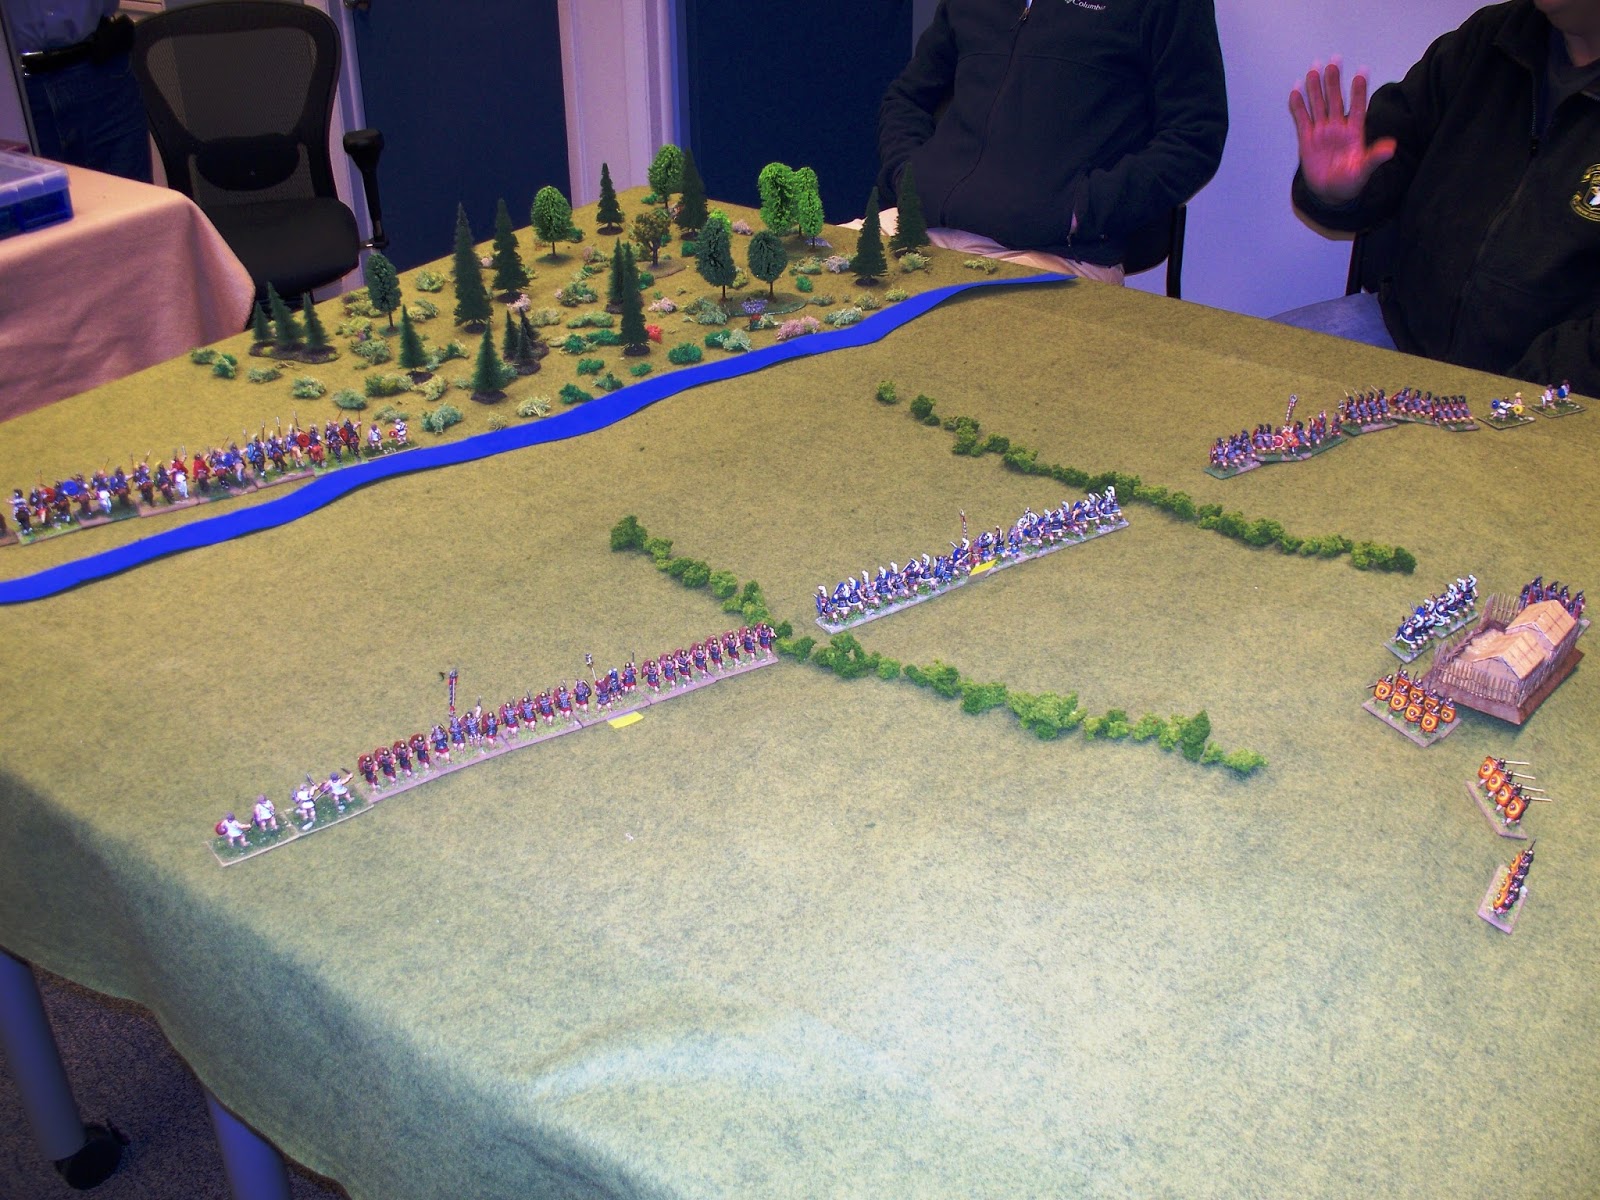
We used Caesar's commentaries and the Society of Ancients 2005 Sambre Battle Pack document as references for this game (available on the DBMM Yahoo Group website). The battlefield map was taken from Peter Sides' book "Ancient Historical Battles, Vol 2." Caesar had 8 legions in total. Six legions were deployed on a low hill near the Sabis River constructing a camp. The other 2 legions (raw troops) were far back, marching up towards the camp. The Romans sent a force of cavalry and light infantry across the river to scout. There was a large wooded hill on the other side of the river, where the Belgae were massing to attack. This was the setting for our game.
I converted the order of battle into Giant DBA format, and was as follows:
Above shows the battlefield. The Roman recon force is across the river. 3 Roman commands containing 6 legions are deployed below the central hill, each command deployed between a row of hedges. The camp on top of the hill is unfinished, and 4 out of 10 blade stands from each command are in and around the camp engaged in camp building and foraging. The 13th & 14th Legions were arriving on the far right table edge. This was the scene before the Belgae attacked.
We used Caesar's commentaries and the Society of Ancients 2005 Sambre Battle Pack document as references for this game (available on the DBMM Yahoo Group website). The battlefield map was taken from Peter Sides' book "Ancient Historical Battles, Vol 2." Caesar had 8 legions in total. Six legions were deployed on a low hill near the Sabis River constructing a camp. The other 2 legions (raw troops) were far back, marching up towards the camp. The Romans sent a force of cavalry and light infantry across the river to scout. There was a large wooded hill on the other side of the river, where the Belgae were massing to attack. This was the setting for our game.
I converted the order of battle into Giant DBA format, and was as follows:
Roman Order of Battle
Command A: 7th & 12th
Legions = 10 x 4Bd, 2 x Ps
Command B: 8th & 11th
Legions = 10 x 4Bd
Command C: 9th & 10th
Legions = 10 x 4Bd, 2 x Ps
Command D: 13th & 14th
Legions = 10 x 4Bd, 2 x Cv, 1 x 3Ax, 2 x Ps
Command E: Scouting Force - 6 x Cv, 3 x 3Ax, 2
x Ps.
Belgae Order of
Battle
Nervii Left Flank Command: 12 x Wb, 2 x
Ps, 1 x Cv
Nervii Center Command: 12 x Wb, 2 x Ps,
1 x Cv
Nervii Right Command: 12 x Wb, 2 x Ps,
1 x Cv
Atrebates & Viromandui Right Flank Command:
12 x Wb, 2 x Ps, 1 x Cv
Above shows the battlefield. The Roman recon force is across the river. 3 Roman commands containing 6 legions are deployed below the central hill, each command deployed between a row of hedges. The camp on top of the hill is unfinished, and 4 out of 10 blade stands from each command are in and around the camp engaged in camp building and foraging. The 13th & 14th Legions were arriving on the far right table edge. This was the scene before the Belgae attacked.
Above left is another view of the table. Above right is the Scouting force.
Above left is the blue shielded 8th & 11th legions deployed between the hedges. The hedges only effected movement, reducing movement to 1 BW. Above right is the elite 9th & 10th legion. In our game, elite blades have the option of pursuing defeated foes instead of it being mandatory. We also determined that "quick kill" results only applied in the enemy bound, & elite blade recoiled instead when beaten, but not doubled by warband in it's own bound.
Above left, the Belgae come screaming out of the woods towards the Roman scouts. Above right, the Belgae cross the Sabis and towards the Romans on the hill. We used a 50% command demoralization point in this game. However, the 13th & 14th legions and the Atrebates & Viromandui commands were raw or unenthusiastic troops whose break point was 33%.
Above left, the Roman scouts fall back across the Sabis and defend the bank (the Sabis didn't effect movement, but both sides could defend the bank at +1). Above right the far left Belgae command is approaching the red shielded legionaries.
Above left, the Atrebates & Viromandui command set to cross the river. Above right, the Belgae approaching the blue shielded 8th & 11th Legions.
Above right, the red shieded Romans are in a desperate fight with the Belae. Above right, the blade stands in and near the camp were allowed to make tactical moves towards their commands without pip expenditures until they came within command distance of 8 BW. Apparently in real life, these troops had instructions to join up in the event of an attack. Also note the 13th & 14th Legions approaching in the rear.
Above left, the Roman scouting force is being reduced by attrition. Above right, the 7th & 12th Legions were at the breaking point.
Above left, the 9th & 10th Legions have moved up to support the scouts. Above right, the 8th & 11th Legions are now engaged in a desperate struggle.
Above right, the 7th/12th Legion command has broken. Cavalry from the 13th/14th Legions has arrived to support. Above right, the scouts are still holding on, supported by the 9th/10th Legion.
Above left, the battle line of the 8th/11th Legions is really broken up. Above right, the Romans are trying to hold the remnants of the 7th/12th legions.
The 13th/14th Legions are deploying, but still too far away. Above right, the scouts suffer 50% casualties and the command breaks.
Above left, the 8th/11th Legions command breaks. This ends the game. Above right, the remnants of the 7th/12th Legions, with the 13th/14th Legions just coming into view.
Above is the 13th/14th Legion, too little too late.
Historically, the Belgae left flank made it up to the Roman camp before it was thrown back. The Roman scouts escaped the Belgae onslaught, and the 9th/10th Legions drove the Belgae back across the Sabis and apparently reached the Belgae camp. The Belgae were destroyed.
The players were:
Belgae: Ron Jaffe, Bill Hupp, Andrew Kirby
Romans: Dave Benjamin, Bob Pavlik, Sylvain Durand.
We will tweek some things when we run this game again, but overall it seemed to work Ok.
Overall, the players enjoyed the game. Time elapsed was 3 hours.
Subscribe to:
Posts (Atom)