Showing posts with label Giant DBA. Show all posts

Tuesday, January 3, 2017

Giant DBA: Issus, an After Action Report

Before Christmas, we were able to schedule and try a Giant DBA scenario, the Battle of Issus. Issus was Alexander's second great victory over the Persians, and over Darius himself. We used my 15mm collection of Essex figures that I painted in early 1990 or so, veterans of many games of WRG 7th, DBM, & Tactica.

For the scenario, we relied on an article and order of battle produced by Jeff Jonas at this link:
http://www.ancientbattles.com/Issus/Issus.htm

While Jonas' Order of Battle is based on Warhammer Ancient Battles, we adapted it for Giant DBA. The Persian army had 66 elements, while the Macedonians had 51. 

Some experimental rules we used to add flavor to the game were:


  • Grading Factors: Some troops were considered Elite, others Mediocre, and some elements could be Fast (adding 1 BW to their movement). Elite troops added +1 to their combat die roll in certain circumstances (when they rolled low, or 1,2, 3), while Mediocre troops subtracted 1 (when they rolled high on a 4,5,6). On reflection after the game, we will make future "plus" or "minus" to the die results more subtle by applying the modifier when an element rolls a tie in distant or close combat - the plus or minus will break the tie one way or the other. Elite troops were: Companions, Prodromoi, Agrianians, Agema Phalangites (2 elements), Hypaspists, and Thessalians. Mediocre troops were Persian Kn, & Greek Allied Hoplites. Fast troops were Companions, Hypaspists, & Persian Kinsmen Cavalry.
  • Hypaspists are a curious troop type. 4Ax just doesn't seem to do them justice. In the old WRG 7th & DBM Army list books, Phil Barker used to allow them the option of being Spears, Auxilia (S), or Pikes. In the game, we allowed them to be spears in good going, and 4Ax in rough/bad going. However, in future games we will allow them to be 4Ax that are Elite, Fast, and allow them side support with each other in good going.
  • Loose Order Fall back: We allowed all Ps or 3/4Ax that suffered a combat outcome of recoil to fall back anywhere from 1/2 BW to 1 BW. This is an optional rule that DBA playtester Joe Collins came up with that I like.
  • Elite Troops Pursuit: We allow Elite troops the option of whether to pursue defeated opponents or not, regardless of whether their element type is one that pursues or not.
  • Command: Alexander rolled all the pip dice and assigned one to each sub general and himself. This represents Alexander's superior leadership ability. However, the Persian commanders separately each rolled their own command die. Also, the Persian commands tended to be larger (15-19 elements), which necessitated keeping elements in groups as much as possible to conserve pips. Break point for each command is 50%. An option is to have commands that reach 33% losses to be "disheartened", suffering -1 in all subsequent combats.


Above, the armies of both sides are deployed for battle. Macedonians are in the foreground.

Darius in his chariot with his Kinsmen Bodyguard Cavalry behind the Mercenary Greek Hoplites. The Persian levy is further back.

The Persian right flank cavalry command of Nabarzanes. We downgraded Persian Kn elements to Mediocre for this game.

Persian Kardakes and Psiloi defending the Panaurus River ford on the Persian left flank. Satrap Rheomithres is attached to the Persian cavalry, upper right.

Persian Psiloi coming down from the hills to harass the Macedonian right flank.

The Macedonian army begins moving forward. In future games, we will position them closer to the Panaurus River.

Nabarzane's Persian Cavalry has crossed the Panaurus on the Persian right (see above left). Alexander & the Companions & Prodromoi are moving towards the ford. The Agrianians are driving back the Persian flanking Psiloi (lower center).

Parmenion's Thessalian cavalry is meeting Nabarzane's Persian Cavalry on the Macedonian left. Persian Kardakes have crossed the river nearby. Alexander had massed the Hypaspists and Agema Phalangites with the Companions near the ford. The Agrianians have destroyed the persian flanking force and are also moving towards the ford (lower right). The Persians are spending pips and bringing up their Levy (Hordes) from the rear.


A close-up of the action between Parmenion and Nabarzane's cavalry.

Alexander, the Agema Phalangites, Hypaspists, Companions & Prodromoi approaching the ford.

Parmenion is not doing well. Coenus' phalangites have veered to the left instead of hitting straight ahead at the Greek Mercenaries. Alexander's assault of the ford has not gone well either, losing 2 Companion elements. Rheomithres' cavalry has crossed the Panaurus and attempting to flank Alexander (lower right).


Death throes of Parmenion, whose command breaks.


Rheomithres' command breaks. Persian Levy approaching the ford to block it. The Hypaspists & Agema are preparing to assault the Kardakes left of the ford.


Unfortunately, we did not finish this battle. However, it was a learning experience and the next game should be improved. We plan to run this as an 8 player convention game. Experience in the game caused a revised OOB, now for 8 players:

Persian Issus OOB:
Nabarzanes: 1 x Sub-General (3Kn(M)), 2 x Satrap Guard (3Kn(M)), 7 x Colonist Cavalry (Cv), 5 x Arachosians (LH). 15 elements.
Thymondes (Greek Polmarch): 1 x Sub-General (Sp), 7 x Mercenary Hoplites (Sp), 3 x Kardaka Hoplites (4Ax), 5 x Kardaka Light Infantry (3Ax). 16 elements.
Darius, Emperor: 1 x General (LCh), 2 x Kinsmen Cavalry (3Kn (M)(F)), 8 x Persian Levy (Hd), 3 x Kardaka Hoplites (4Ax), 5 x Kardaka Light Infantry (3Ax). 19 elements.
Rheomithres: 1 x Sub-General (Cv), 1 x Persian Cavalry (Cv), 2 x Persian Light Horse (LH), 4 x Skirmishers (Ps), 3 x Mardians (Ps), 4 x Greek Peltasts (4Ax), 1 x Takabara (3Ax). 16 elements.
Macedonians Issus OOB:
Parmenion: 1 x Sub-General (Cv(E)), 3 x Thessalians (Cv(E)), 1 x Greek Allied Cavalry (Cv), 3 x Thracian Mercenary & Cretan Archers (Ps), 4 x Phalangites (Pk). 12 elements.

Coenus: 1 x Sub-General (Pk), 9 x Phalangites (Pk), 4 x Greek Allied Hoplites (Sp(M)). 14 elements.

Alexander: 1 x General (3Kn(E)(F)), 3 x Companions (3Kn(E)(F)), 2 x Prodromoi (LH(E)), 3 x Hypaspists (4Ax*,(E)(F)), 2 x Macedonian Archers (Ps), 1 x Greek Peltasts (4Ax), 1 x Mounted Grooms (LH). 13 elements. *Side Support in GG.

Nicanor: 1 x Sub-General (Pk(E)), 1 x Agema Phalangites (Pk(E)), 4 x Agrianians (Ps), 6 x Greek Allied Hoplites (Sp(M)). 12 elements.

Thanks to Bill Hupp, Dave Rutter, Bob Pavlik, Ross Bentley, & Ron Jaffe for assisting with our playtest.


Wednesday, October 5, 2016

Bosworth: A Giant DBA 3.0 After Action Report

A few weeks ago we tried re-fighting Bosworth, a battle from the English War of the Roses. Bosworth was a critical battle in history as Richard III, of the Yorkist Plantagenete dynasty, was killed and his forces defeated by Henry Tudor. We used Giant DBA 3.0 rules, slightly modified.

Below shows the forces deployed. The forces of Richard are on the right, while Henry's are on the left. The involvement of Northumberland's command (lower right in the photo) and the Lord Stanleys command (Thomas & William, upper left in the photo) were via die roll. Richard rolled a "6" on turn one and Northumberland became involved immediately.

Below is a close-up of Richard's men. Note that the billmen (blades in DBA) are providing side support to the longbowmen.

Below is a close-up of Henry's forces, which include French Mercenary Pikemen. Our referee, scenario designer, and owner of these miniatures for the game, Mr. Bob, is in the background.

The Yorkist artillery park is below. The artillery exchange during the battle would become particularly deadly for the Yorkists.

Below, the Stanley's (Thomas & William) waiting to come into action. Or rather, waiting to see what the best course of action would be.

The battle begins below. Both sides advancing toward each other. Northumberland (lower right) is working his way around the marsh.

A close-up.

The approaches further developing. The Yorkists have already lost an artillery element in the mutual artillery duel.

A close-up of the Tudor right flank (left in photo).

Just as things looked promising for the Yorkists with Northumberland coming up on the flank, the Stanley's decide to intervene and arrive behind the Tudor right flank (center-left in photo).

The battle starts developing into a slugging match below, especially on the Yorkist left. Northumberland still hasn't made his presence felt. Only one Yorkist artillery element is left while the Tudors have lost all of theirs (with the exception of Stanley's). The French mercenary pikemen are taking loses in the center.

Below, the Yorkist left hits Stanley, while Northumberland is still lagging back (though moving at full BW's). 

Below shows the end of the game when our time limit was reached. The center was a confused melee. Northumberland finally hits Stanley on the Yorkist left, while on the right, the Yorkists were pressing forward to engage the Tudor left. The element losses for both sides were even at 14 per side at this point, so we called it a draw. A couple more turns would have brought a conclusion. For the game, we decided to use a total army break-point of 33%, instead of individual command break-points. Total elements per side were about 48.

Richard Plantagenete survived the battle. The scale of the figures are 28mm, many by Front Rank.


Thursday, May 5, 2016

Giant DBA: Battle of the Sabis (Sambre) 57 BC

We tried another Giant DBA scenario last Wednesday, the Battle of the Sabis (or Sambre), 57 BC. In this battle, Julius Caesar defeated the Gallic Belgae tribes. We recreated the battle for Giant DBA 3.0.

We used Caesar's commentaries and the Society of Ancients 2005 Sambre Battle Pack document as references for this game (available on the DBMM Yahoo Group website). The battlefield map was taken from Peter Sides' book "Ancient Historical Battles, Vol 2." Caesar had 8 legions in total. Six legions were deployed on a low hill near the Sabis River constructing a camp. The other 2 legions (raw troops) were far back, marching up towards the camp. The Romans sent a force of cavalry and light infantry across the river to scout. There was a large wooded hill on the other side of the river, where the Belgae were massing to attack. This was the setting for our game.

I converted the order of battle into Giant DBA format, and was as follows:


Roman Order of Battle
Command A: 7th & 12th Legions = 10 x 4Bd, 2 x Ps
Command B: 8th & 11th Legions = 10 x 4Bd
Command C: 9th & 10th Legions = 10 x 4Bd, 2 x Ps
Command D: 13th & 14th Legions = 10 x 4Bd, 2 x Cv, 1 x 3Ax, 2 x Ps
Command E: Scouting Force - 6 x Cv, 3 x 3Ax, 2 x Ps.

Belgae Order of Battle
Nervii Left Flank Command: 12 x Wb, 2 x Ps, 1 x Cv
Nervii Center Command: 12 x Wb, 2 x Ps, 1 x Cv
Nervii Right Command: 12 x Wb, 2 x Ps, 1 x Cv

Atrebates & Viromandui Right Flank Command: 12 x Wb, 2 x Ps, 1 x Cv

                                    
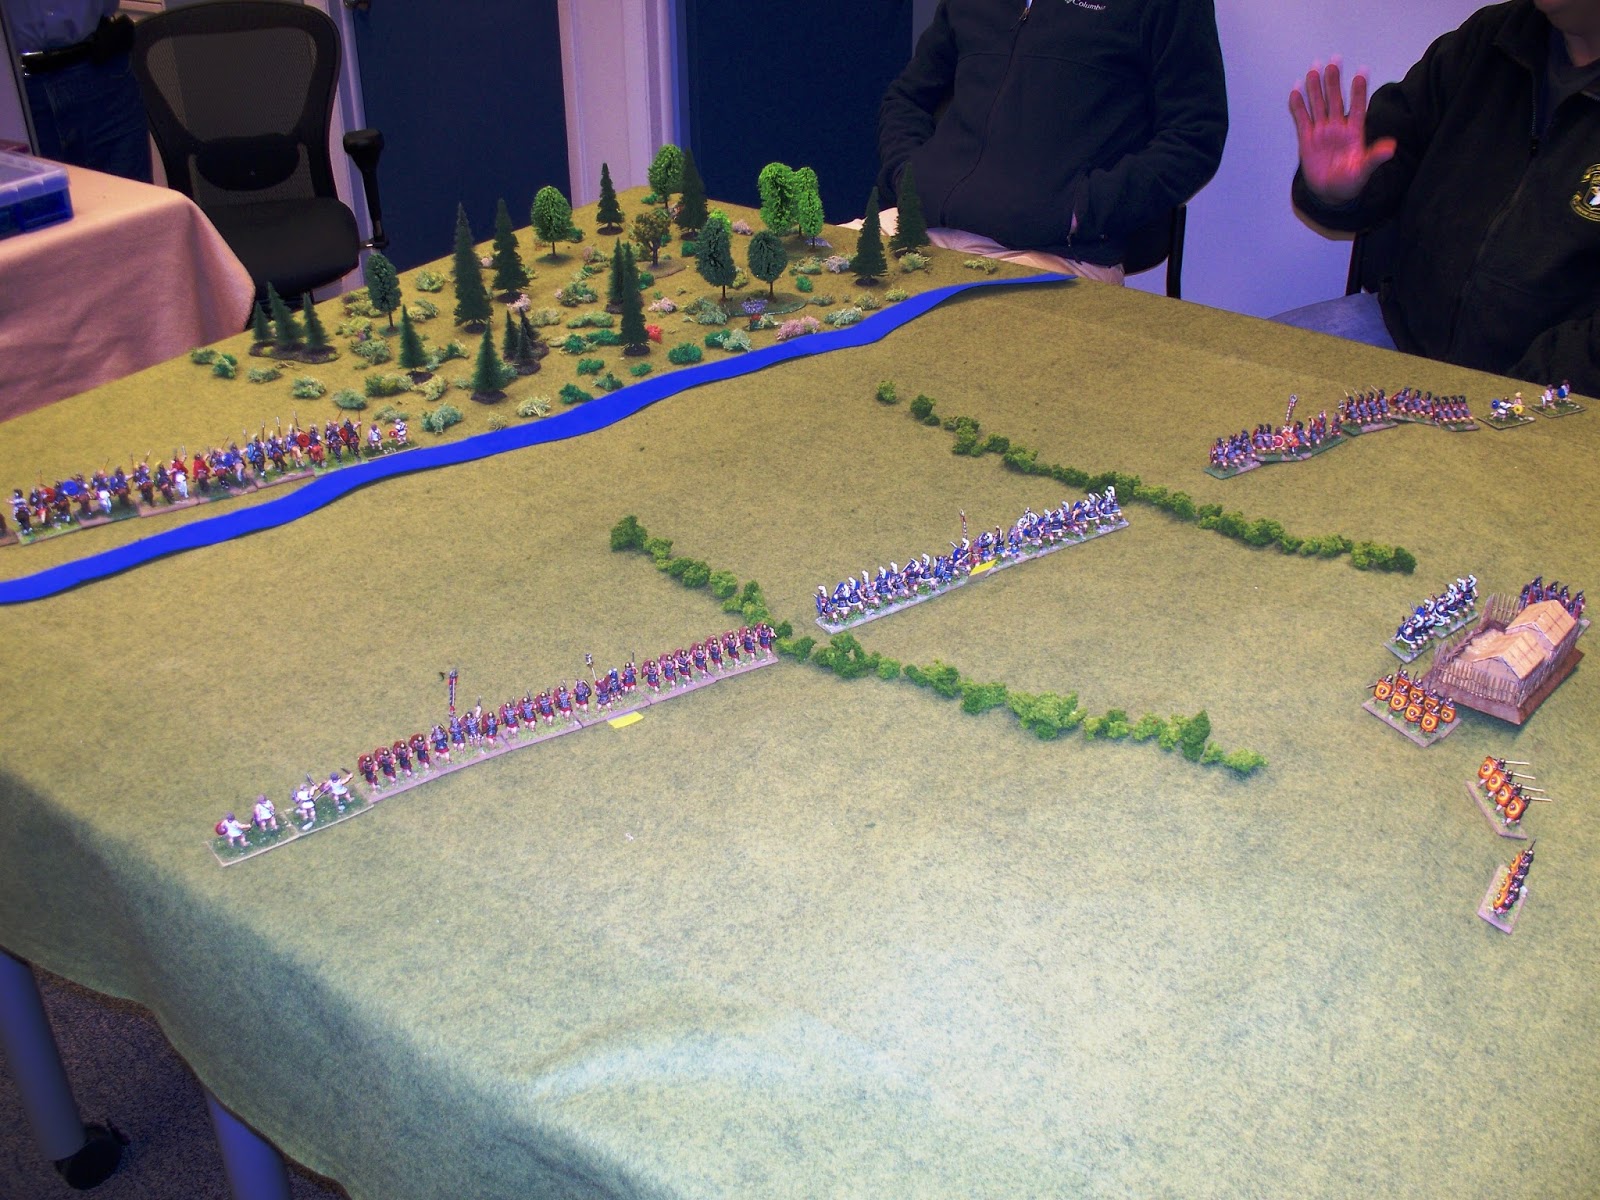
Above shows the battlefield. The Roman recon force is across the river. 3 Roman commands containing 6 legions are deployed below the central hill, each command deployed between a row of hedges. The camp on top of the hill is unfinished, and 4 out of 10 blade stands from each command are in and around the camp engaged in camp building and foraging. The 13th & 14th Legions were arriving on the far right table edge. This was the scene before the Belgae attacked.


Above left is another view of the table. Above right is the Scouting force.

                                   
Above left is the blue shielded 8th & 11th legions deployed between the hedges. The hedges only effected movement, reducing movement to 1 BW. Above right is the elite 9th & 10th legion. In our game, elite blades have the option of pursuing defeated foes instead of it being mandatory. We also determined that "quick kill" results only applied in the enemy bound, & elite blade recoiled instead when beaten, but not doubled by warband in it's own bound. 

                                   
Above left, the Belgae come screaming out of the woods towards the Roman scouts. Above right, the Belgae cross the Sabis and towards the Romans on the hill. We used a 50% command demoralization point in this game. However, the 13th & 14th legions and the Atrebates & Viromandui commands were raw or unenthusiastic troops whose break point was 33%.

                                  
Above left, the Roman scouts fall back across the Sabis and defend the bank (the Sabis didn't effect movement, but both sides could defend the bank at +1). Above right the far left Belgae command is approaching the red shielded legionaries. 

                                 
Above left, the Atrebates & Viromandui command set to cross the river. Above right, the Belgae approaching the blue shielded 8th & 11th Legions.

                                 
Above right, the red shieded Romans are in a desperate fight with the Belae. Above right, the blade stands in and near the camp were allowed to make tactical moves towards their commands without pip expenditures until they came within command distance of 8 BW. Apparently in real life, these troops had instructions to join up in the event of an attack. Also note the 13th & 14th Legions approaching in the rear.

                                
Above left, the Roman scouting force is being reduced by attrition. Above right, the 7th & 12th Legions were at the breaking point.

                                
Above left, the 9th & 10th Legions have moved up to support the scouts. Above right, the 8th & 11th Legions are now engaged in a desperate struggle.

                                
Above right, the 7th/12th Legion command has broken. Cavalry from the 13th/14th Legions has arrived to support. Above right, the scouts are still holding on, supported by the 9th/10th Legion.

                                
Above left, the battle line of the 8th/11th Legions is really broken up. Above right, the Romans are trying to hold the remnants of the 7th/12th legions.

                                
The 13th/14th Legions are deploying, but still too far away. Above right, the scouts suffer 50% casualties and the command breaks.

                                
Above left, the 8th/11th Legions command breaks. This ends the game. Above right, the remnants of the 7th/12th Legions, with the 13th/14th Legions just coming into view.

Above is the 13th/14th Legion, too little too late.

Historically, the Belgae left flank made it up to the Roman camp before it was thrown back. The Roman scouts escaped the Belgae onslaught, and the 9th/10th Legions drove the Belgae back across the Sabis and apparently reached the Belgae camp. The Belgae were destroyed.

The players were:
Belgae: Ron Jaffe, Bill Hupp, Andrew Kirby
Romans: Dave Benjamin, Bob Pavlik, Sylvain Durand.

We will tweek some things when we run this game again, but overall it seemed to work Ok.

Overall, the players enjoyed the game. Time elapsed was 3 hours.