In Part 1 (click here) the invasion of Britain got off to a bad start for the Romans, who were licking their wounds after their disastrous first encounter with the Britain's. What caused such crippling casualties to the heavy infantry Roman legionaries by a bunch of half naked guys in colorful rags?
In the DBA 2.2 version of the rules, Roman legionaries (blades) were allowed rear support by a psiloi element when a psiloi was directly behind a blade, or directly behind a line of blades and within 2 elements. Thus a single psiloi element could support at least 4 blades with a +1 to their combat factor. Therefore, blades could fight at +6 instead of the regular +5. The best base combat factor warband can get against blades is +4, though all warband need to do is beat the blades by +1 to destroy them. Additionally, blades in 2.2 did not make pursuit moves after combat if they recoiled or destroyed the enemy, which usually meant blades maintained an unmovable line.
In DBA 3.0, combat for blades has changed. First, there is no rear support for blade elements; they fight at a consistent +5, unless in bad going. Second, blades must now pursue enemy foot other than psiloi if they are recoiled or destroyed. This fact means that if a blade pursues an enemy, it can possibly advance into a position where either/both flank edges are overlapped by enemy, lowering their combat value to +4, or even +3. Finally, warband can still "quick kill" blades in 3.0 as in 2.2 by merely beating the blades by +1, which is now easier to do. However, the warband must fight in 2 rank formations to get +4, which in turn, reduces their army frontage and makes their flanks more vulnerable in the game.
Falling back towards Dubra, Caesar rallied his army, brought up reserves, and moved to confront the pursuing Britain's. The army composition for both sides was basically the same as before. (Bob & I were playing matched pairs, so we exchanged armies to see who could do better.)
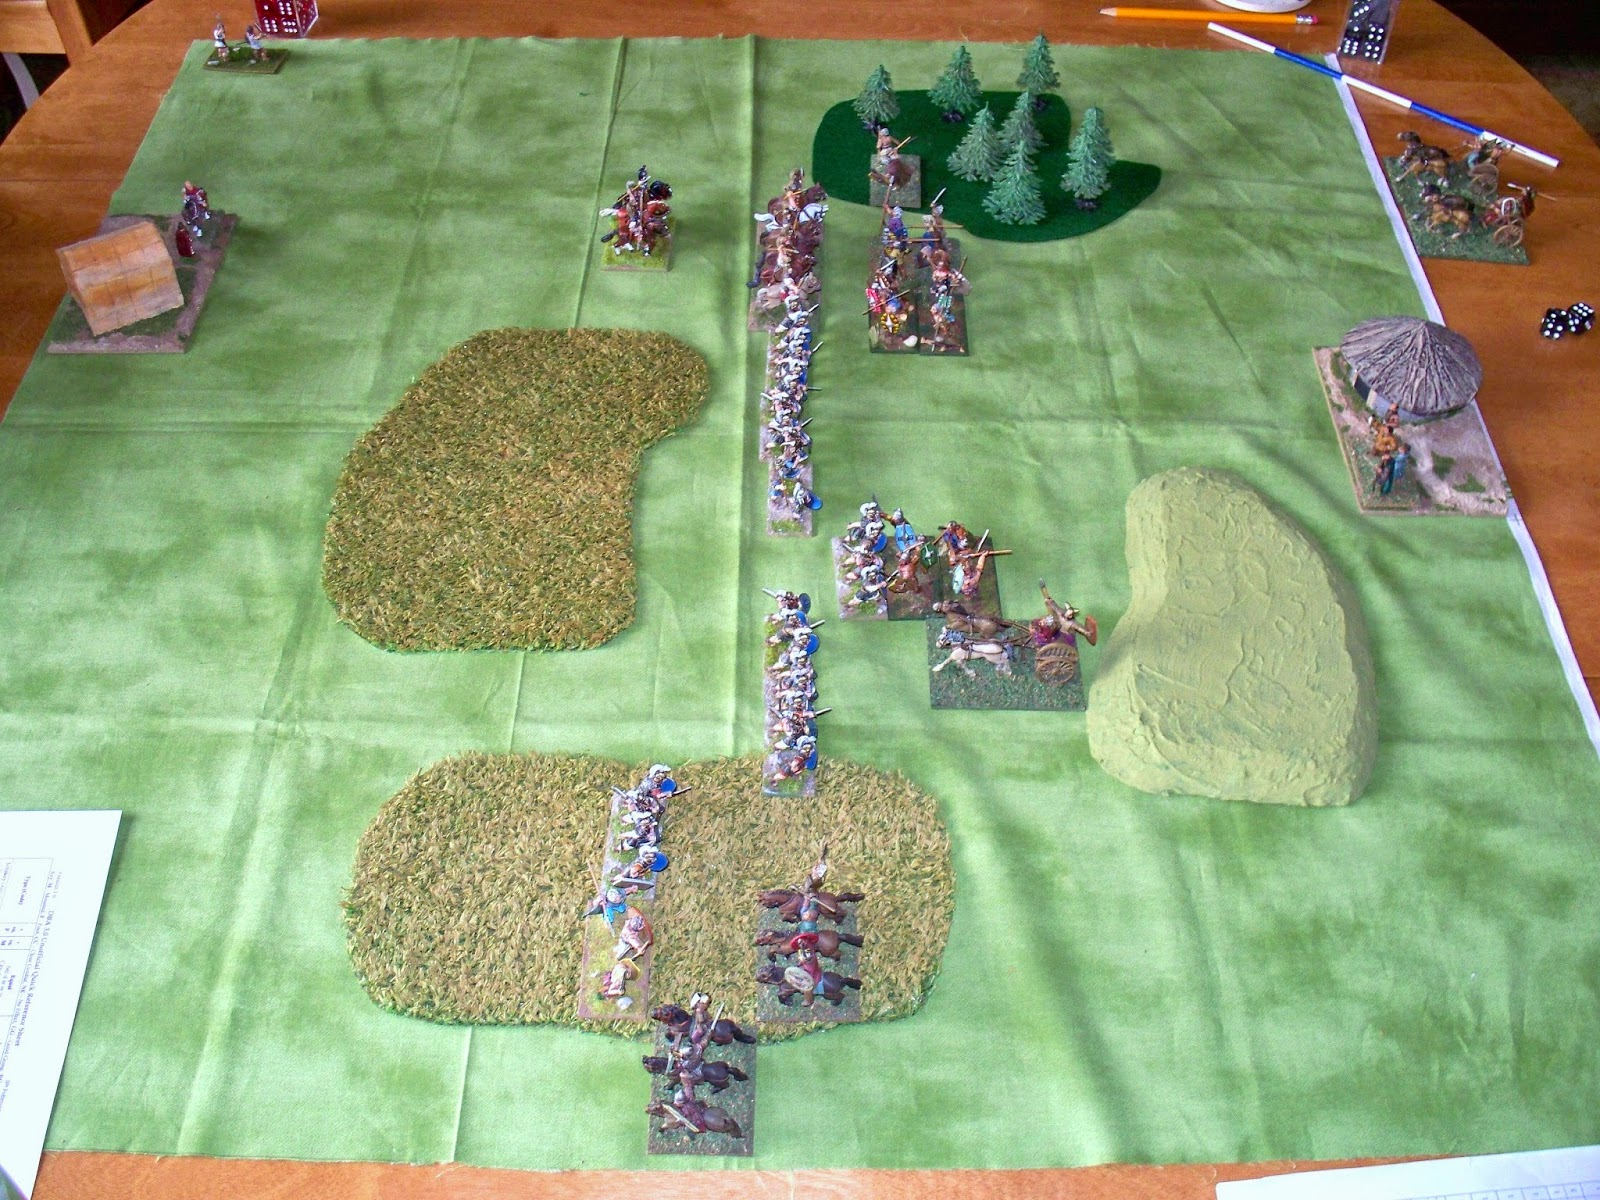
Above shows the pre-battle deployment. As in the first game, the Britain's were the defenders and chose/placed the terrain: 2 compulsory plough, and 2 optional pieces: a woods and a gentle hill. The Romans (on the left) deployed in a long line, cavalry on the left flank, light infantry on the right. The Britain's (right) deployed with their chariots and light horse in a single group on the left flank, while the warbands were in a single group on the right near the woods, with a single psiloi element in the woods.
As will be seen, this deployment for the Romans was probably an error; their light infantry was facing the Britain's chariots and light horse on an open flank, while the Roman cavalry on the left was restricted by the woods in front of them. The Romans should have placed their cavalry on their right flank and the light infantry on the left. Also, the far right Romans were out of command distance from the mounted general (command distance is 8 base widths), further causing the Romans problems, requiring extra pip expenditures to move their right flank troops.
Above shows the end of turn 2. The plough terrain is good going again. The Romans, to compensate for their weak right flank, have advanced but shifted their line in that direction using many pips. The 3 groups of Britain's are cautiously moving forward together. Note that the British light horse is in 2 ranks and has rear support like the warbands.
At the end of turn 4 above, the Britain's have launched their mounted troops at the Romans and both sides have lost elements: the Romans a psiloi and the Britain's lost a chariot. A gap has developed between the Romano-Gaul auxilia and the legionaries.
Above shows the end of turn 5. The Romans have stabilized their line and destroyed another enemy chariot. The Romans lead 2-1. However, the Britain's light horse is close to working around the Roman right flank, and a group of 2 warbands has joined the British general in his chariot in the center.
The end of turn 6 above shows that the Romans have advanced across the table center line, engaging the warband and general in the center. The Romans are also bringing their cavalry into a position to attack the warband near the woods. However, there is still an opening for the British light horse on the Roman right.
Above shows the end of turn 7. The Roman cavalry and a blade have engaged the warband near the woods, with the Romans losing a cavalry element. The British psiloi has advanced out of the woods to support the warband. In the center the Romans lose a blade, quick killed by the warband, while another blade counter-attacks. On the Roman right flank, inconclusive combats are going on. The Britain's are now winning 3-2.
The end of the game on turn 8 (above) shows that the Romans have lost another blade in the center. The Roman cavalry near the woods has repelled a flanking attack by the warbands, and the Romano-Gaul auxilia has caused an element of British light horse to flee (below right). The Britain's win 4-2.
The jubilant British camp celebrate victory.
Caesar & Rufio leave the field dejected, embarking at Dubro for better campaigns in Gaul.


Hahhaa... nice ending.
ReplyDeleteKeep up the good work.
Great looking game, love the British camp and the conclusion!
ReplyDeleteIs that a scratch built camp for the Brits? I plan on making my own. Made tons in 28mm. Now I wanna make some in 15mm with stockade an all. :)
ReplyDeleteYes,, scratch built from cardboard, paper towel.
DeleteIs it me, or am I seeing some missed flank attacks for the Romans in turns 6 and 7? On their left wing, as well as in the center.
ReplyDeleteThe Gauls had a failed flank attack on Roman cavalry. The Romans didn't flank the warband & chariot general in the center - lack of pips I believe.
DeleteNice write up Dave. Good analysis of each side under 3.0. The Romans needed better tactics in both games. Come on Ceasar.
ReplyDelete